
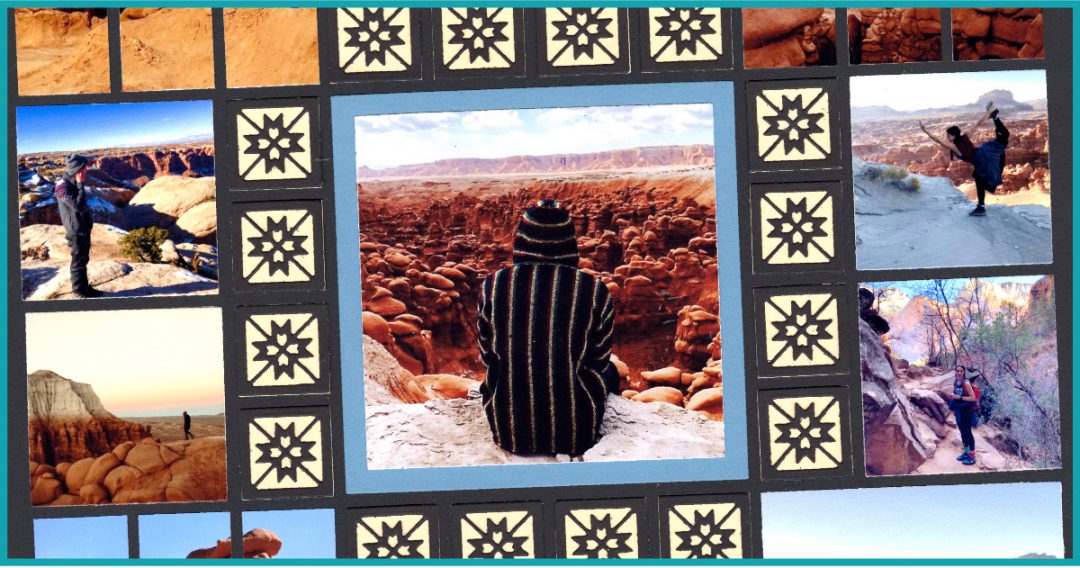
1. Create a Full Mosaic
"Natural Bridge" by Tami Potter - Pattern #160
Nature pictures are perfect for this. Tami, blended multiple 4x6 photos on the grid to create the appearance of one large photo.
Mosaic layouts are how Mosaic Moments® all began. Tami wanted to use up a lot of photos so she created a mosaic!
Mosaics are actually very fun to create. You can use the 1in Grid Die or you can use a self healing mat and craft knife to hand cut your photos. We recommend the Mosaic Moments® Double Sided Self- Healing 14x14 Cutting Mat and Fiscars Softgrip Craft knife.
Gather up similar photos and create your own mosaic on the grid!
2. Create a Smaller Mosaic
There are many ways to make a photo mosaic. Mosaics aren't only 1 in. squares. There are many shapes and sizes and you can use many different dies to get a mosaic look. Here, Paije used the Perfect Spot Dies Set to create this layout. This die can create a mosaic with framed circles.
Remember to take multiple shots of the same scene to make amazing mosaics and panoramas later.
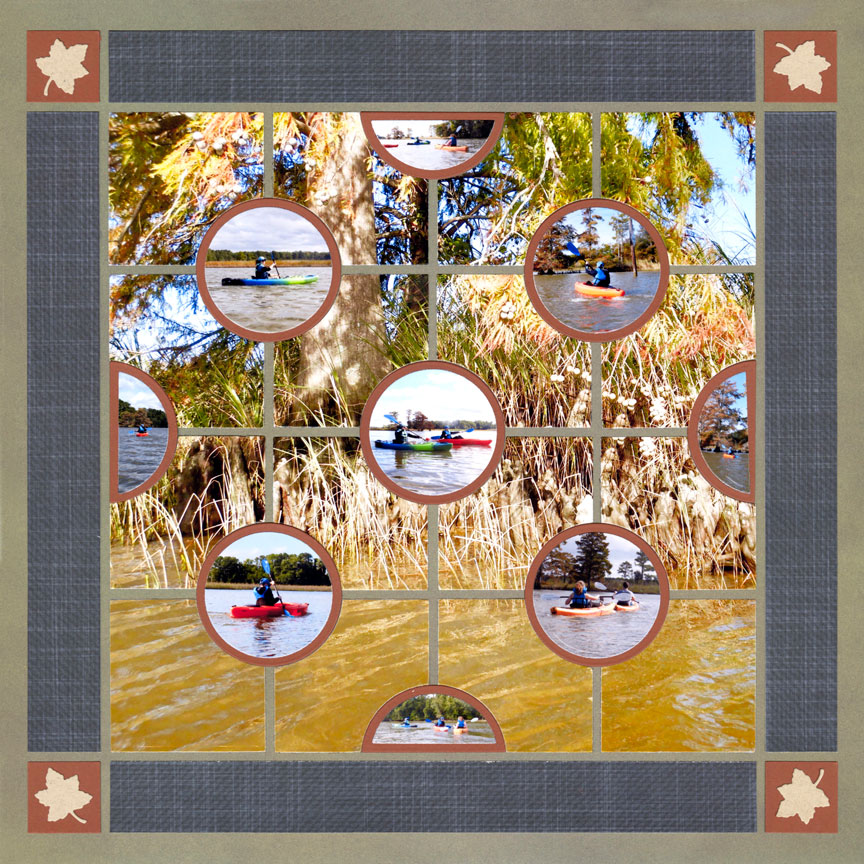
"Powhatan Creek" by Paije Potter - Pattern #110
3. Add Journaling
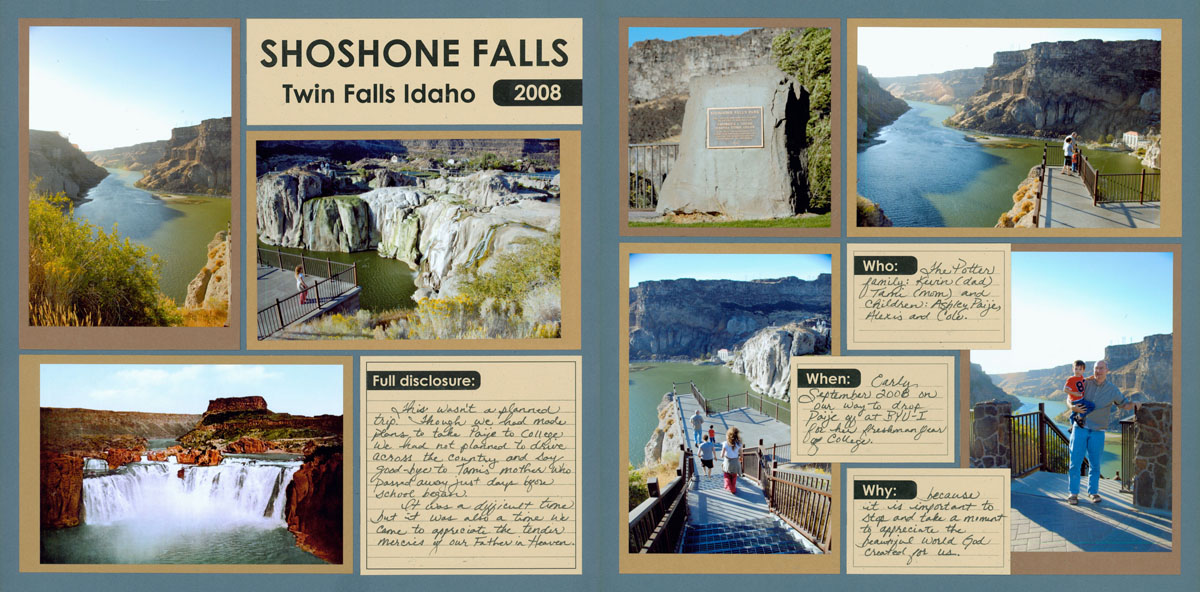
"Shoshone Falls" by Tami Potter - Patterns #284 & Free-styled Pattern
Add journaling to talk about where you were, who was there, and the why. Talk about what you thought about this location and how it felt to be in nature. Share your thoughts and feelings.
Sometimes it is a good idea to use your own handwriting. Your handwriting will be a treasure for future generations. And don't worry about how your writing looks because it is a part of YOU. Take the time to plan your words on scrap paper. You can practice beforehand and then use a pencil very lightly first and erase after using a more permanent pen. Using lined paper helps too.
4. Get Right in the Scene
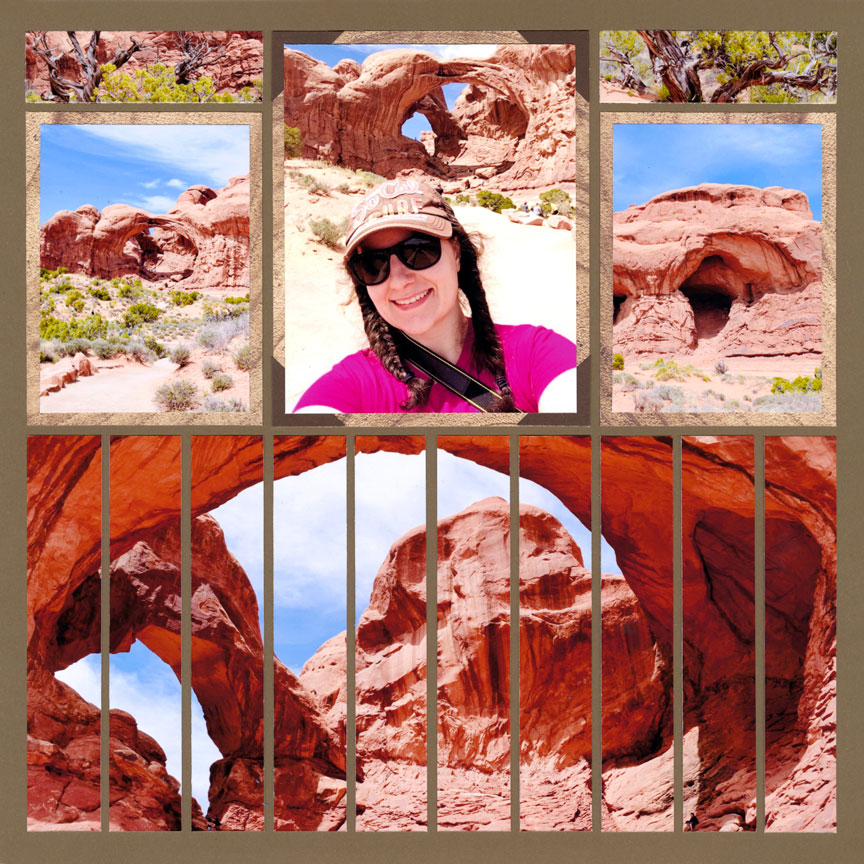
"Double Arch" by Paije Potter - Pattern #588
Panoramics are such a great way to display your photos. Don't be afraid to insert yourself! Take a selfie or ask a stranger to take the shot.
Paije stood underneath the double arch in Arches National park and captured this stunning panoramic shot. She used the Strips 1x5.5in. Die Set to make this layout.
When you are looking through your pages long after the trip is over you will be glad you have a picture of yourself in those stunning scenes.
5. Write Down the Names of the Places
Be sure to write down the names of the places and sites you see!
On this layout, Paije documented the name of each of these geysers in Yellowstone.
Names and tags add more interest and visual appeal to your pages.
Tabs like this could be made with the Nested Scallop Frames Die.
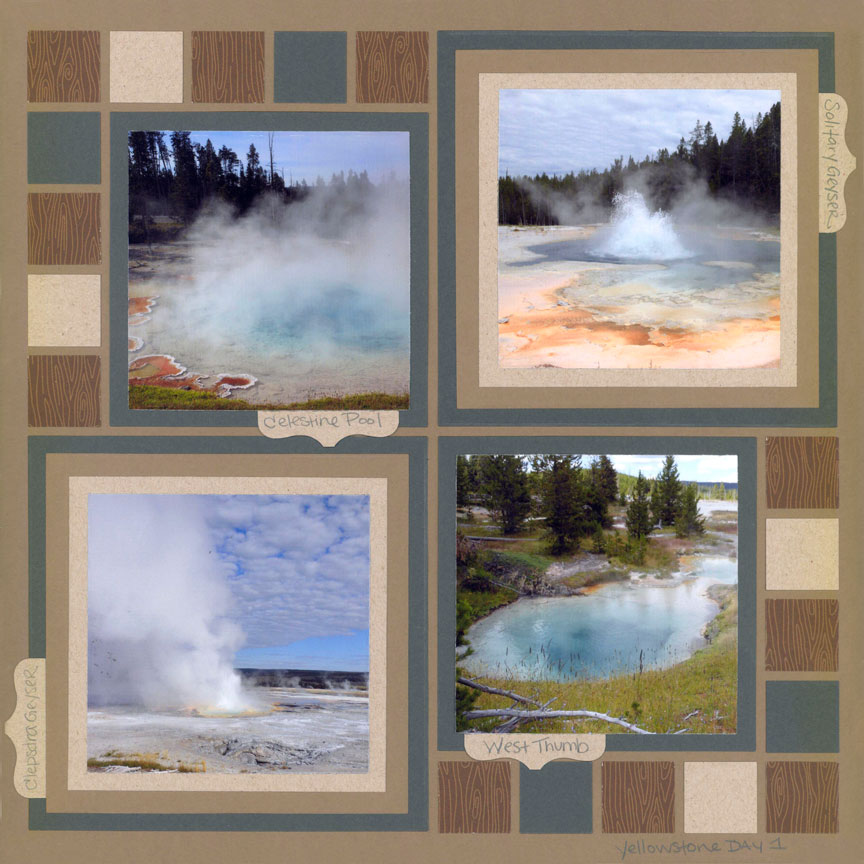
"Yellowstone Geysers" by Paije Potter - Pattern #144
6. Take Vertical Panoramic Shots with the Charmed Die!
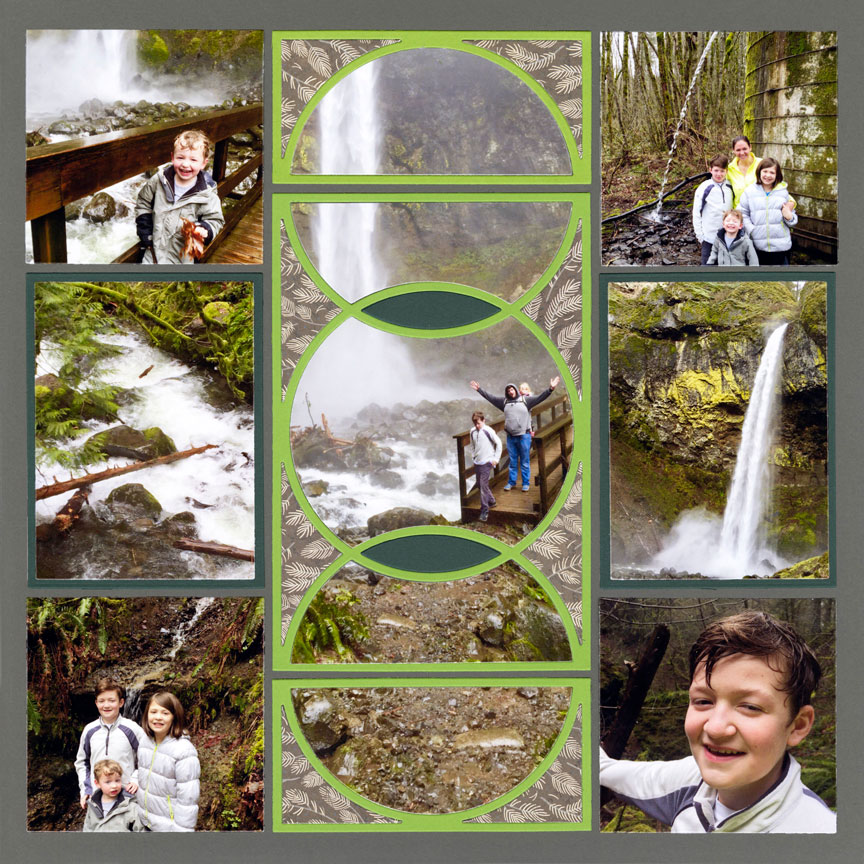
"Waterfall" by Danielle Lawson - Pattern #477
For tall sites, such as a mountain or a waterfall, take panoramic shots vertically to get a charming effect like this one!
Danielle used the Charmed 2x4 Die and the Charmed 4x6 Die to create this page. This die makes the waterfall captivating. Nature has never looked so bewitching!
Try the Charmed Dies on your layout with a waterfall. You will be just as spellbound.
7. Get Up Close with the Chic Die!
Just like the name implies, the Chic Die is elegant and stylishly fashionable. But the die will work with nature photos too!
Jodi got up close to these fossils and plants. They make a fabulous frame to her focal photos within the Chic Die.
Jodi chose the Peach Blossom grid paper from the In the Garden Collection. She chose neutral greys for her Chic dies and patterned paper. All which keep her layout elegant and chic.
When you try the Chic Die your page will be elegant as well.
"Finding Fossils" by Jodi Benson - Pattern #431
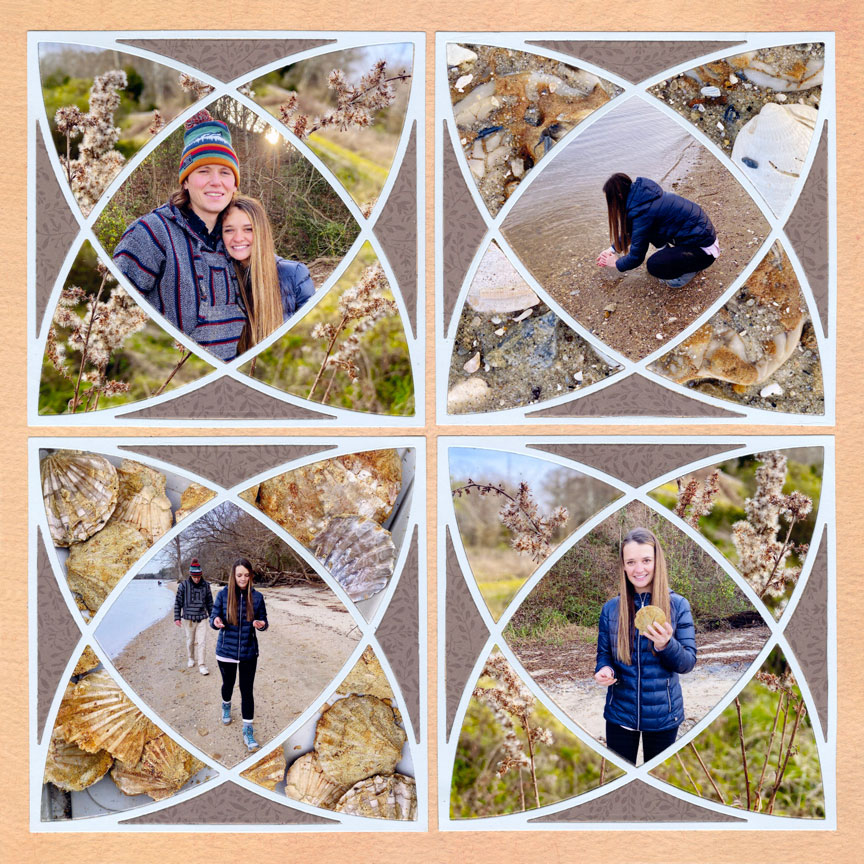
8. Show the Details with the X Factor Dies
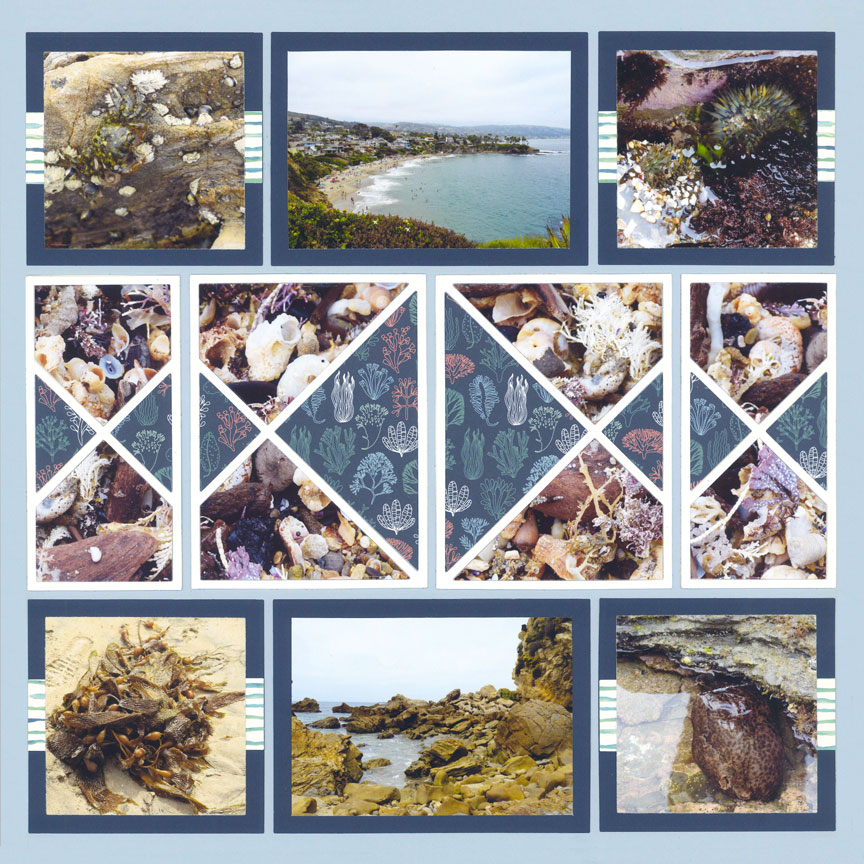
"California Seaside" by Paije Potter - Pattern #371
The X Factor Dies are super extreme and fun to use. They are Level 3 dies so they take a little bit of planning. They have lots of small design spots to fill. Get up close shots to show the teeny tiny details of where you are.
Paije took up-close photos of washed up shells on a beach. Plus, take a look at the other details on this layout!
She used the X Factor 3x4 Die and the X Factor 2x4 Die. Don't they give this page that special "something" that gives this layout an exceptional quality?
9. Use Your Detailed Shots as Fillers
Even rocks make great mosaics and fillers on a layout!
You will never buy patterned paper again with this photo tip for nature. The rocks go perfectly with the shell and landscape pictures because they are a part of the shell and landscape pictures!
Paije used the One Inch Grid Die to make the mini mosaics of rocks. This page rocks and so will your pages!
10. Capture the Terrain with the Diamond Mine Dies
Unearth treasure with the Diamond Mine Dies on your layouts. Diamond Mine is a Level 3 die so with a little time and energy, just like a real diamond, you will have a timeless page.
The Diamond Mine offers many options for design spots. Adding the terrain is a great way to fill them. Tami has two details here - the petroglyph rocks and the sage brush!
She used the Diamond Mine 3x4 Die and the Diamond Mine 3x3 Die.
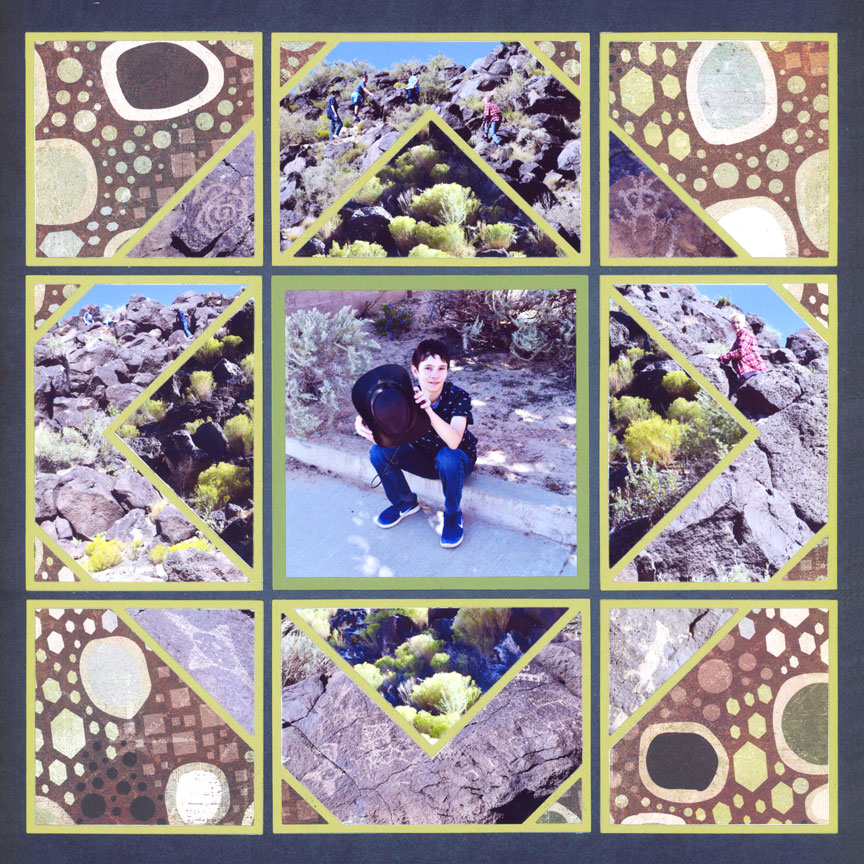
"Petroglyph Monument" by Tami Potter -Pattern #344
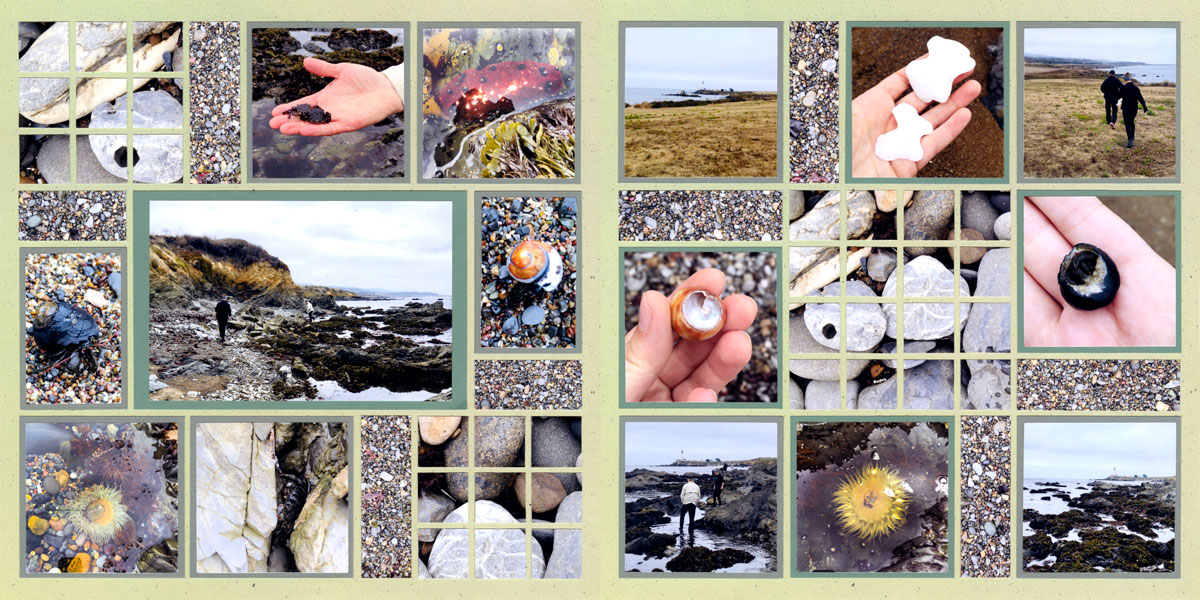
11. Capture Your Setting with the Steps Die & Four Corner Cut Out Die!
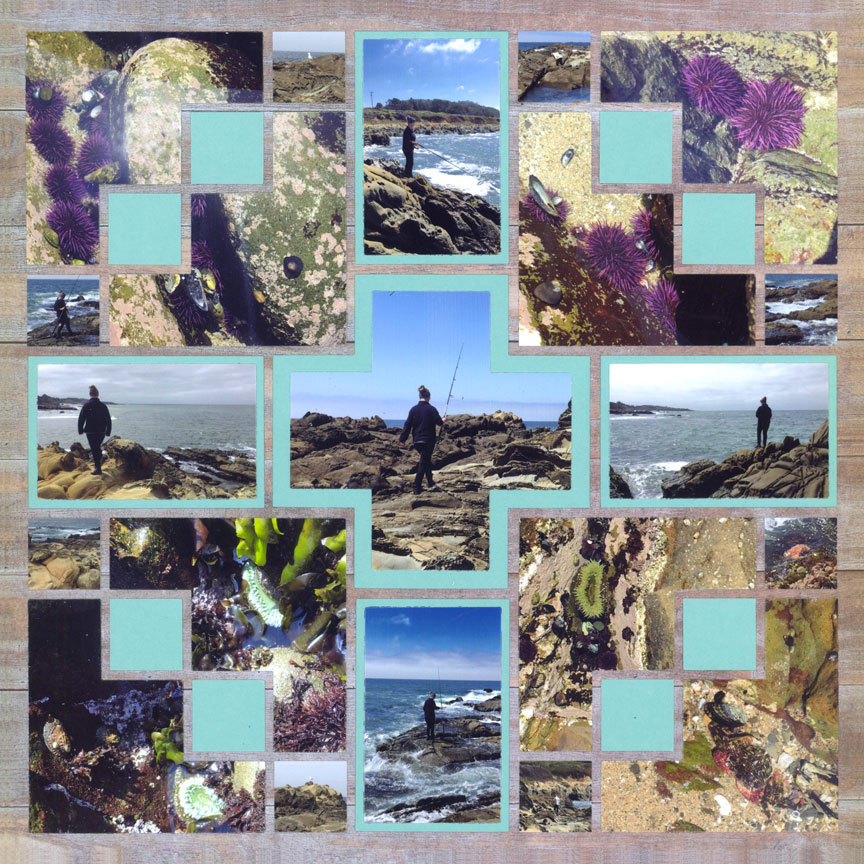
"Fishing on the Rocks" by Paije Potter
Although Paije was on a fishing trip, she looked around and got pics of the tidepools. Getting up close to the details around you helps tell the full story.
This is a great technique when it is difficult to get close to your subject. Like on this fishing trip. Paije had enough photos to fill her page because she took pictures of her setting.
She used the Four Corner Cut Out Die and Steps Die. When she put her layout together she had small 1x1 design spots she filled with colored cardstock and teeny 1x1 photos!
12. Capture the Wildlife
Okay, this tip is an obvious one but look at this great page! Take pictures of the wildlife, they are wonderful creatures.
Although cameras on phones can do a great job taking shots, for wildlife, we recommend using a real camera because they have a better zoom. And of course, the better the camera quality the better the picture quality.
Also, notice that Paije used 1x1 squares of a photo of tree bark on each sides of her layout. It looks like the animals are between the trees!
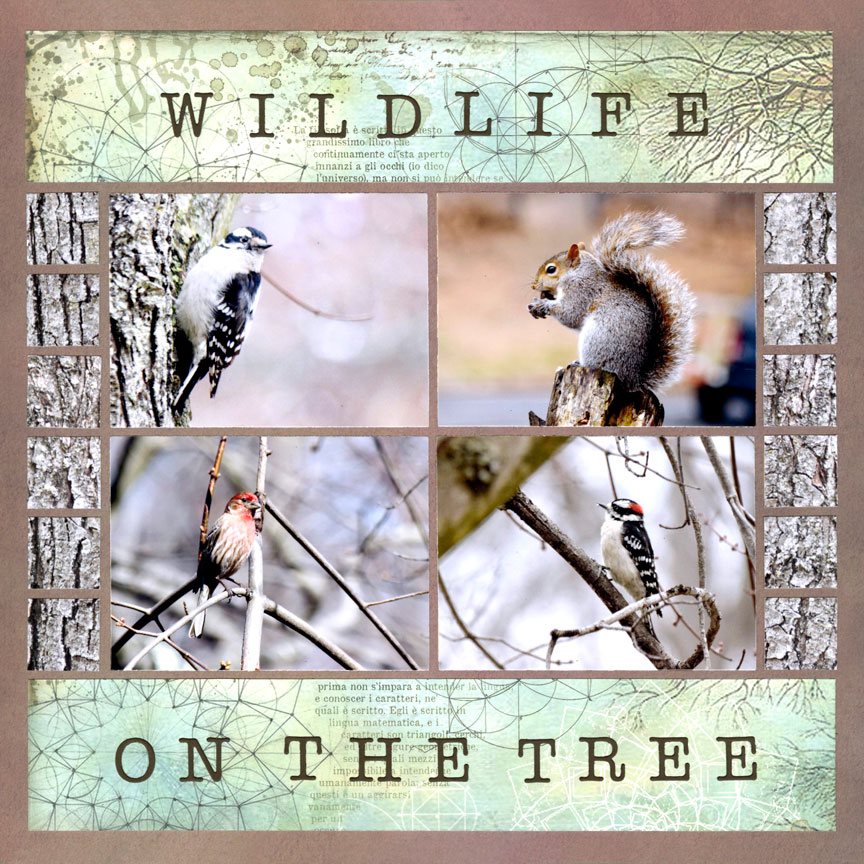
"Wildlife" by Paije Potter - Pattern #585
13. Make Mosaics of Animal Photos
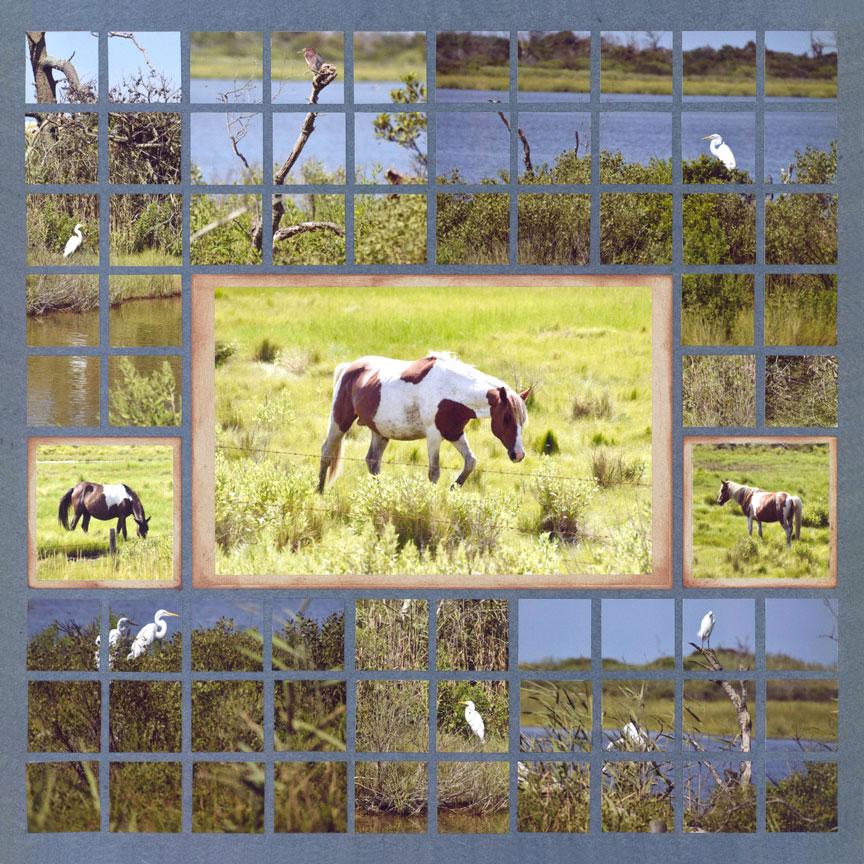
"Chincoteague Island" by Paije Potter - Pattern #271 (re-arranged)
Animal photos make great mosaics too!
Paije lined up her horizon in most of the photos when she cut them. It made this mosaic page even better.
She also chose to center her focal picture which she chose her brightest photo.
Her animals look majestic! Your animal photos will look the same on a mosaic layout!
14. Make the Animals the Focus
On this page, instead of the landscapes being the focus and the biggest photos, the small animals are the focus. Specifically, the crabs.
These captivating crustaceans deserve center stage. Paije used the Circle Frame & Flowers Die Set for her focal crab. She set four other 3x3 crab pictures and mats in the corners of her page then had eight small 2x2 landscape photos.
You can do a similar look with any other subject. This tip is not exclusive to crusty crabs!
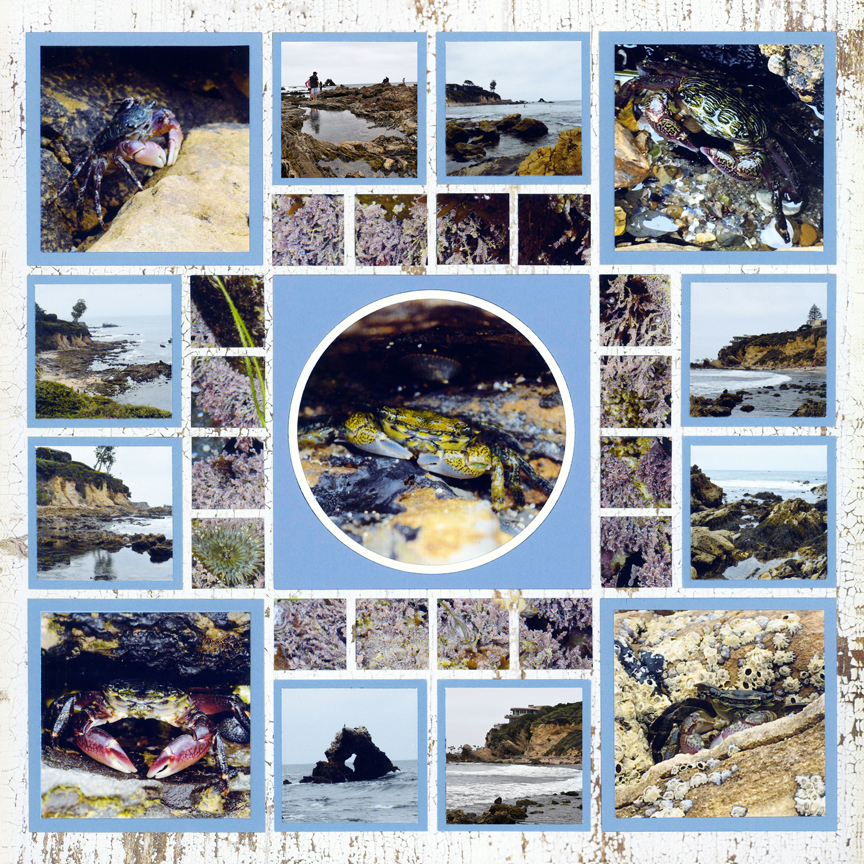
"Crabs" by Paije Potter - Pattern #339
15. Feature Rare Moments with the Horizon Die
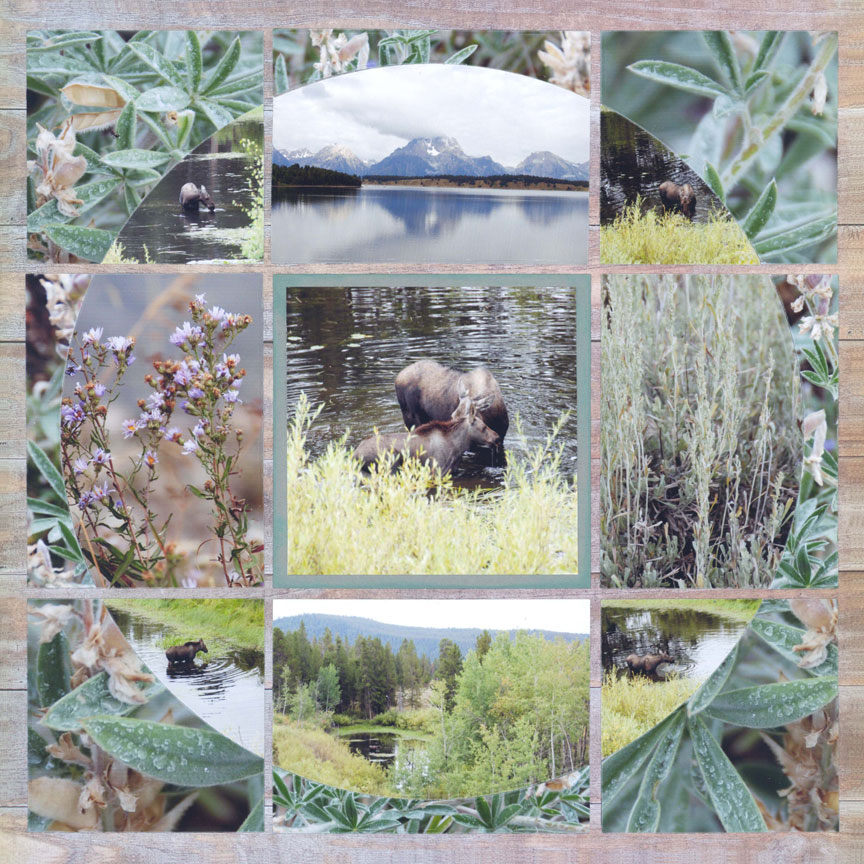
"Moose" by Paije Potter - Pattern #344
Create a layout featuring those rare moments.
Moose can be very difficult to find, so Tami lucked out capturing this moment with a mother and baby.
She used the Horizon Die Set to really bring the focus to this rare photo!
She filled the outer design spots with landscape photos for inside the circle. And close ups of the foliage for outside the circle. Her 12x12 grid background is Cabin Wood from the Lazy Days Collection.
16. Capture Butterflies in Action
Mosaic Moments® is perfect for fitting in a lot of photos of one subject. Don't be afraid of taking a lot of shots.
Especially if they are action shots and your subject is on the go!
Here, Paije captures her butterfly's movements with having a row of five 2x2 photos. She created a weaved design with purple cardstock and pattern paper. You can learn how to create this look on our post here.
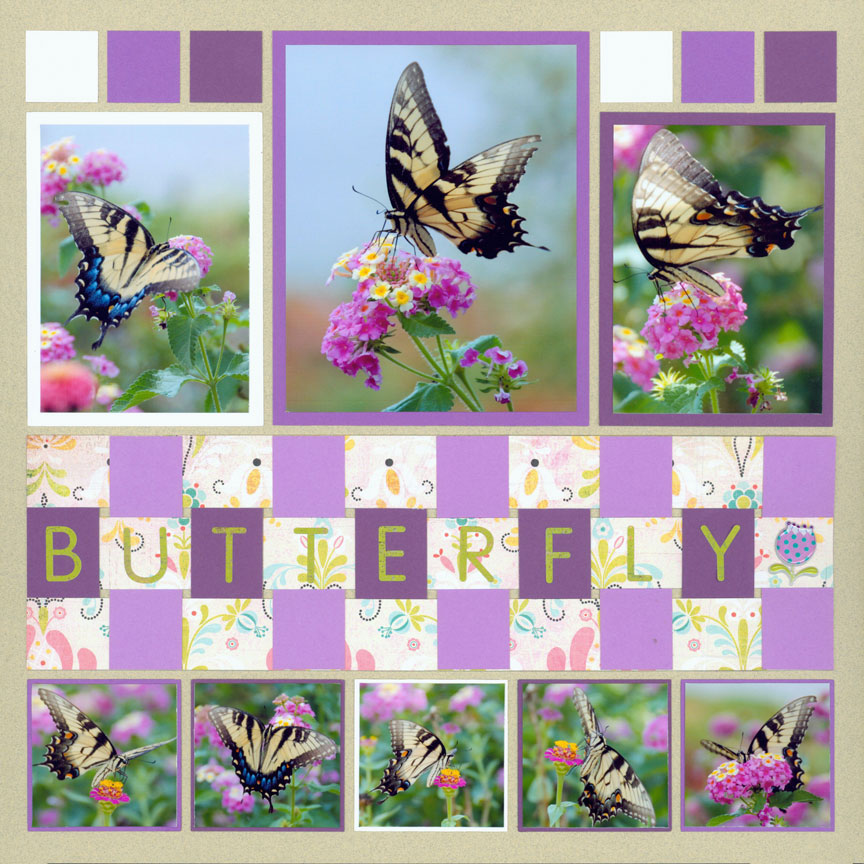
"Butterfly" by Paije Potter - Pattern #315
17. Take Photos of the Animal's Home
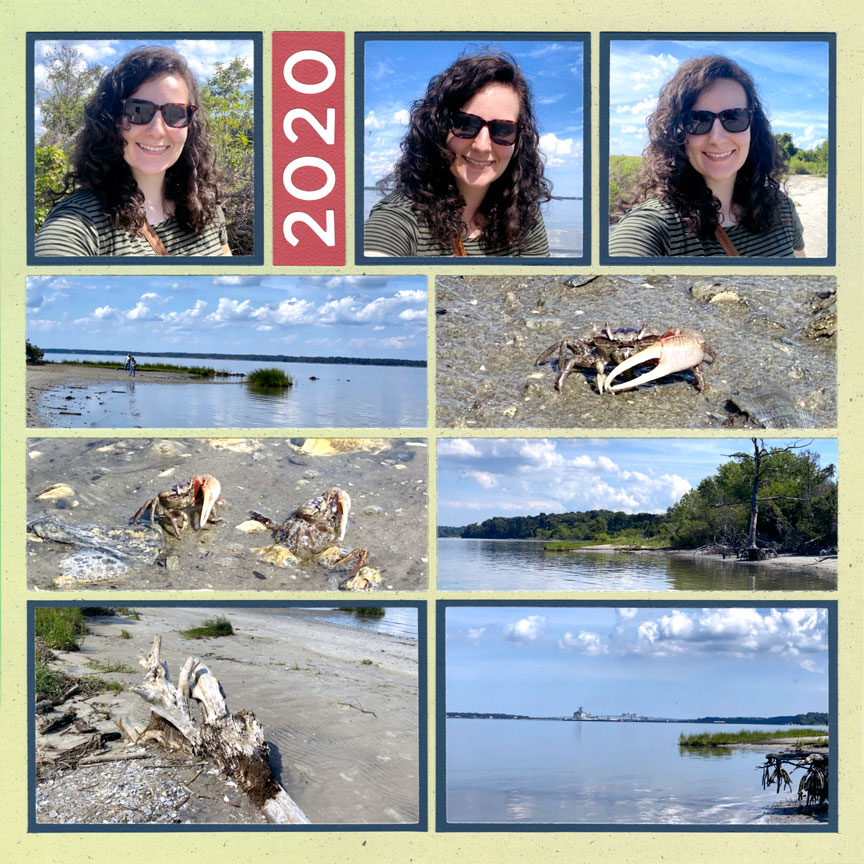
"Stop on the Parkway" by Paije Potter - Pattern #379
When getting shots of wildlife, you may want to take a step back and also capture the landscape they live in.
Paije saw a crab, out and about when she was on the Parkway. She stopped to get a picture of him and then took pictures of his home. She also took some selfies to remember the fun time she had meeting up with the little guy. Paije used the Numbers 2 Die Set for her date.
Take the time to stop and capture nature on your trips, your scrapbooks will tell more stories of your daily life!
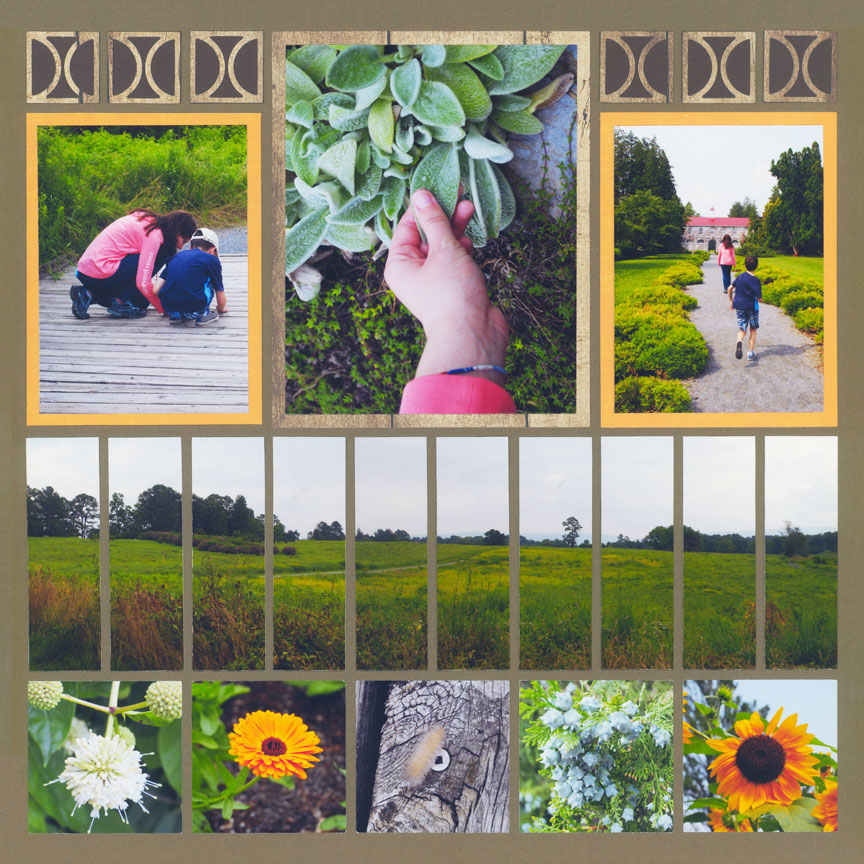
18. Flowers & Plants - The Perfect Subjects Everytime!
Flowers and plants are perfect subjects since they don't ever blink or smirk at you 🙂 or move!
Tami took photos of her favorite tree and even added a poem. Poems are perfect for nature layouts - look online to find any that inspire you.
Notice how Tami added a 3x3 photo in her mosaic. It emphasizes the beautiful blooms. You can almost smell the perfume. Casting away the doom and gloom. Trees and flowers bloom never too soon.
Too much? Well, your pages and poems will be perfect with mosaics!
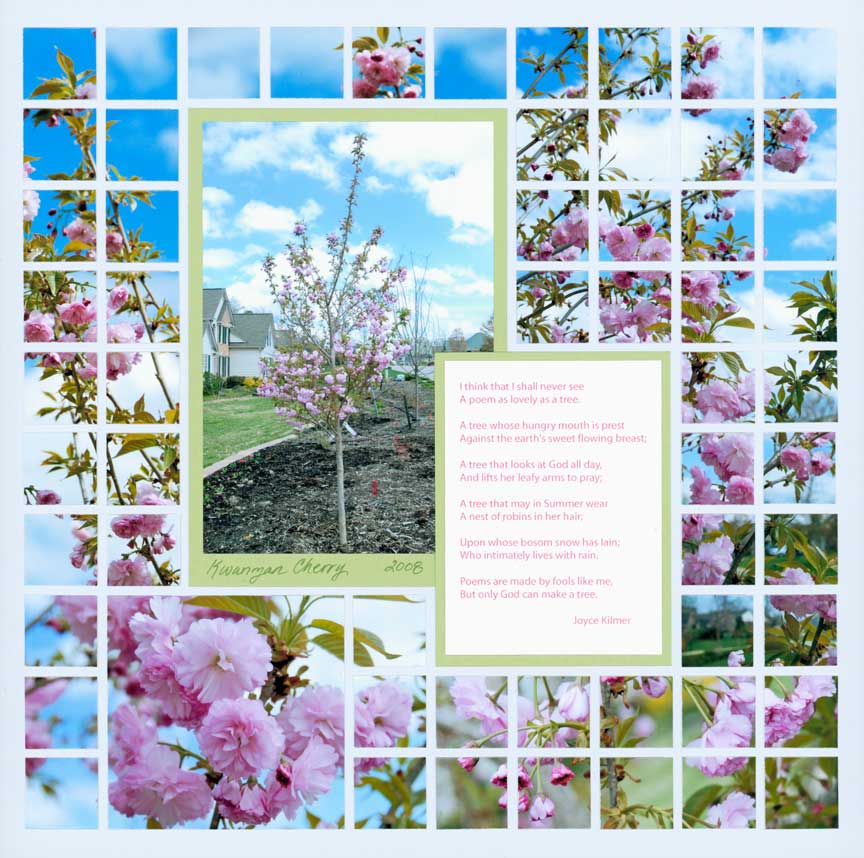
"Kwanzan Cherry Tree" by Tami Potter
19. Insert a Focal Photo in Your Mosaic
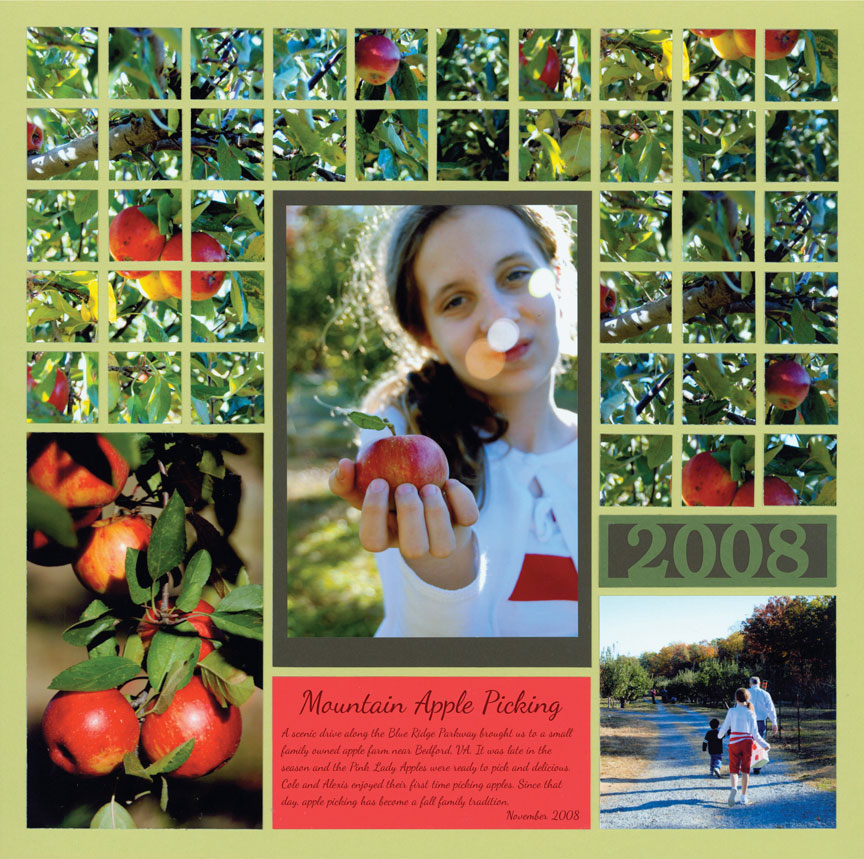
"Mountain Apple Picking" by Tami Potter - Pattern #319
Look up at the tree tops for beautiful leaves or fruit.
Take lots of photos upward then capture close ups of the fruit and leaves. And don't forget your favorite people. Add the date and some journaling and you have a layout made in heaven.
Mosaic layouts are the best for apple picking pages!
Try it with your apple picking photos!
20. Make Flowers & Plants Your Focus
Flower photos are so fun to take. It takes real skill to get the focus right and wait for the wind to die down.
Capture shots of the wildflowers in your area or during your travels. You can always look up the names of the flowers later and include them in your page if you would like.
Paije used the Number Set Die for her date. And the Laying Bundle to crop her larger photos. Her 12x12 grid is Sandstone.
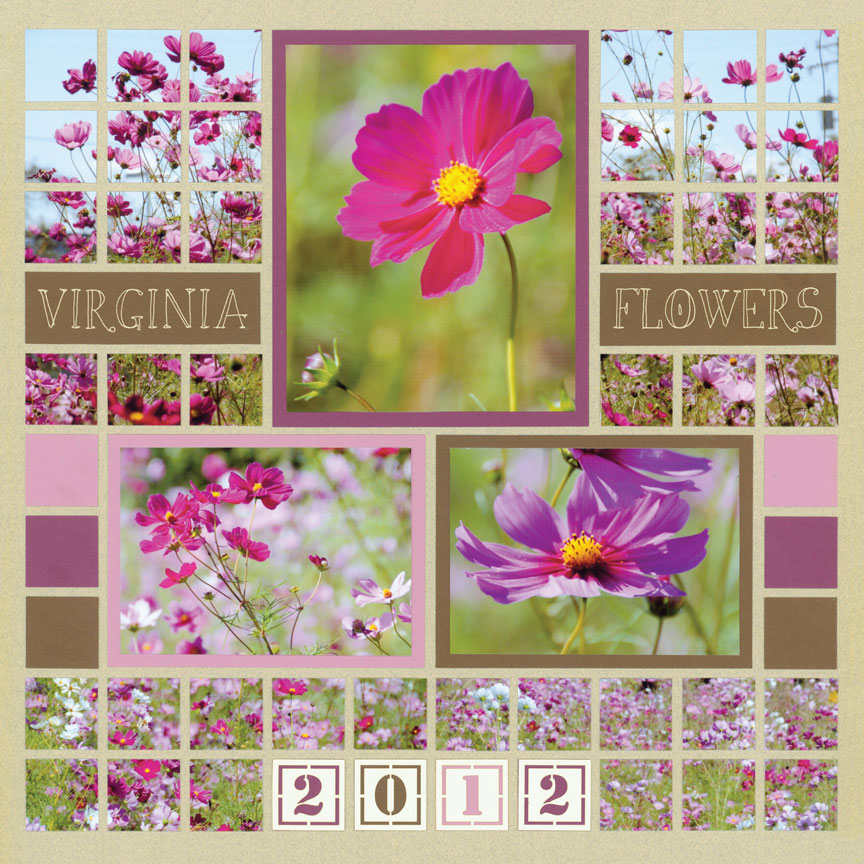
"Virginia Flowers" by Paije Potter - Pattern #168
21. Take Photos During Your Hike
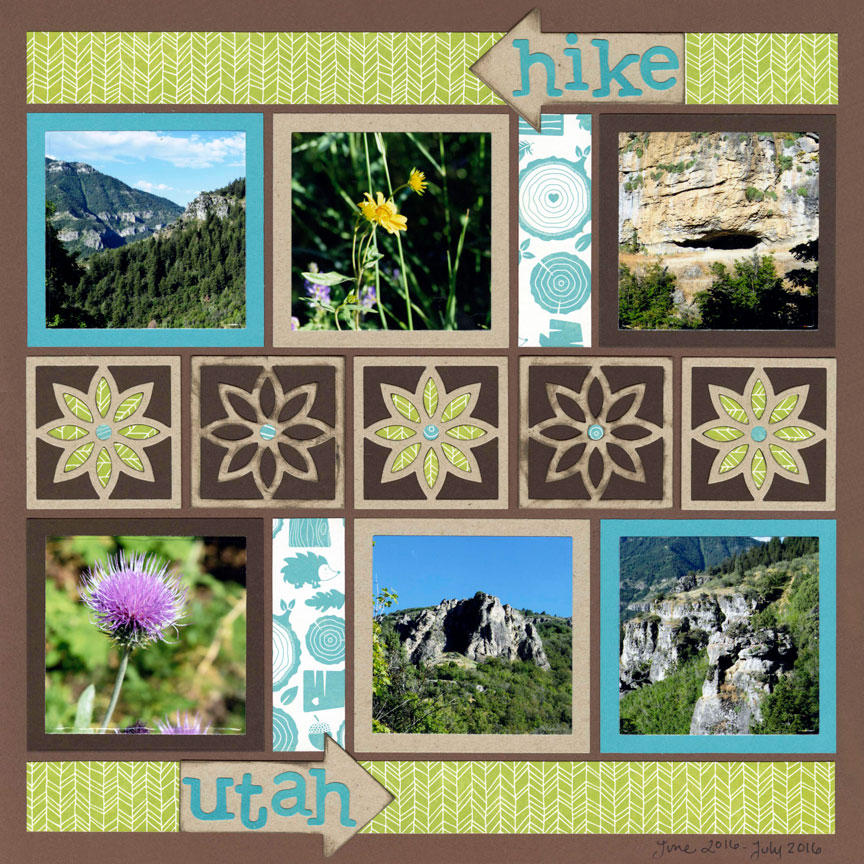
"Hike Utah" by Paije Potter - Pattern #337
Do you like to hike?
Not only did Paije take photos of the mountain scenery, but she also got a couple of photos of flowers. Be sure to look around you during your hiking trips! It's easy to focus on the ground and forget to look up at the opportunities for nature pics when you are on a hike.
She used the Star Flower Die Set, the 2x3 Arrow Die, and the Lowercase 4 Die Set. She will never forget her Utah Hike with this page.
Make a memorable page of one of your hikes!
22. Make a Flower Mosaic

Flowers make wonderful (and easy) mosaic layouts. You really can't go wrong.
Take lots of flower pictures and cut them up in 1x1 squares. Either use the mat, ruler, and a craft knife or roll your One Inch Grid for 4x6 photos through your die machine. (Tami recommends a metal ruler with a corked back.) Then organize them on your grid. Paije used 12x12 Cocoa here. Add a focal picture if you like.
And BAM! You are finished with a layout that all of your scrapbooking friends will be jealous of. They will ask you how you made it!
23. Find Flowers in the Desert
You can find flowers anywhere - even in the desert during the spring months.
The name of Paije's hike was half accurate - it was a garden! She found these beautiful blooms there. I'm not sure about the devil part- she didn't say how grueling this hike was!
She used the Strips 1x3 Die. Plus she added a cute hiking patterned paper.
Find some flowers on your next desert hike and add them to your layouts.
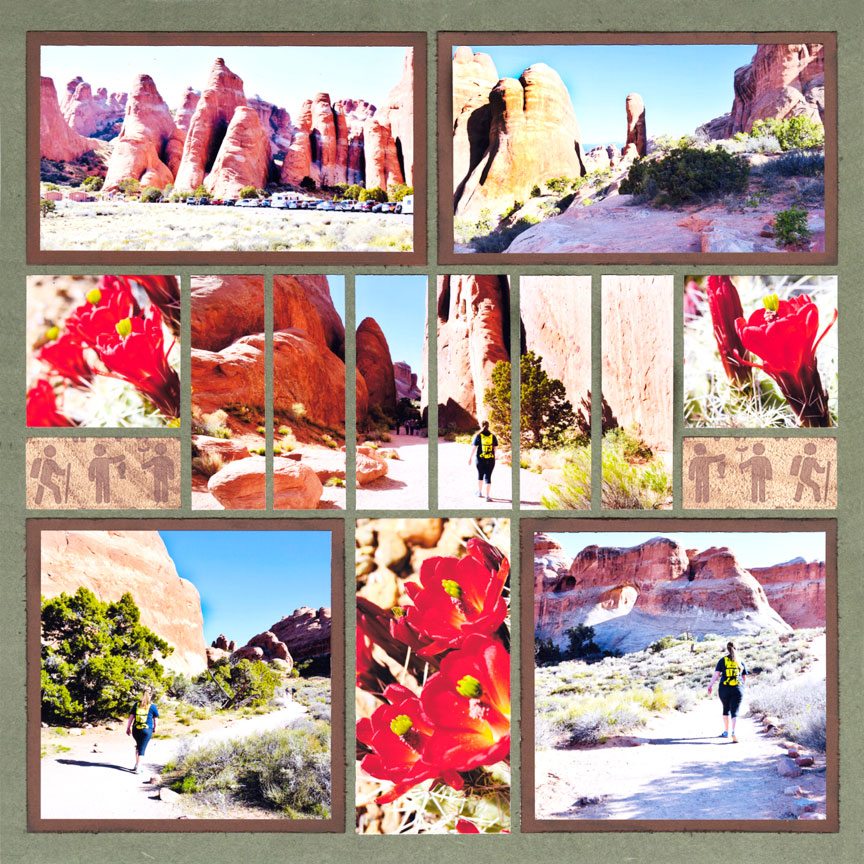
"Devil's Garden - Arches" by Paije Potter - Pattern #415
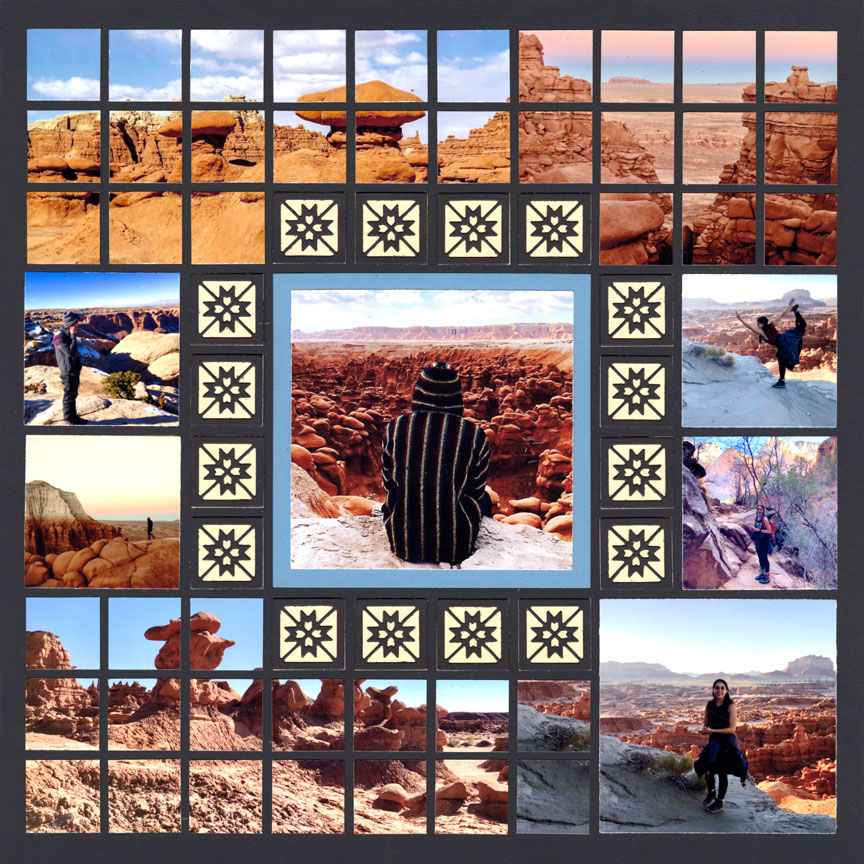
24. Show the Scene in One Photo
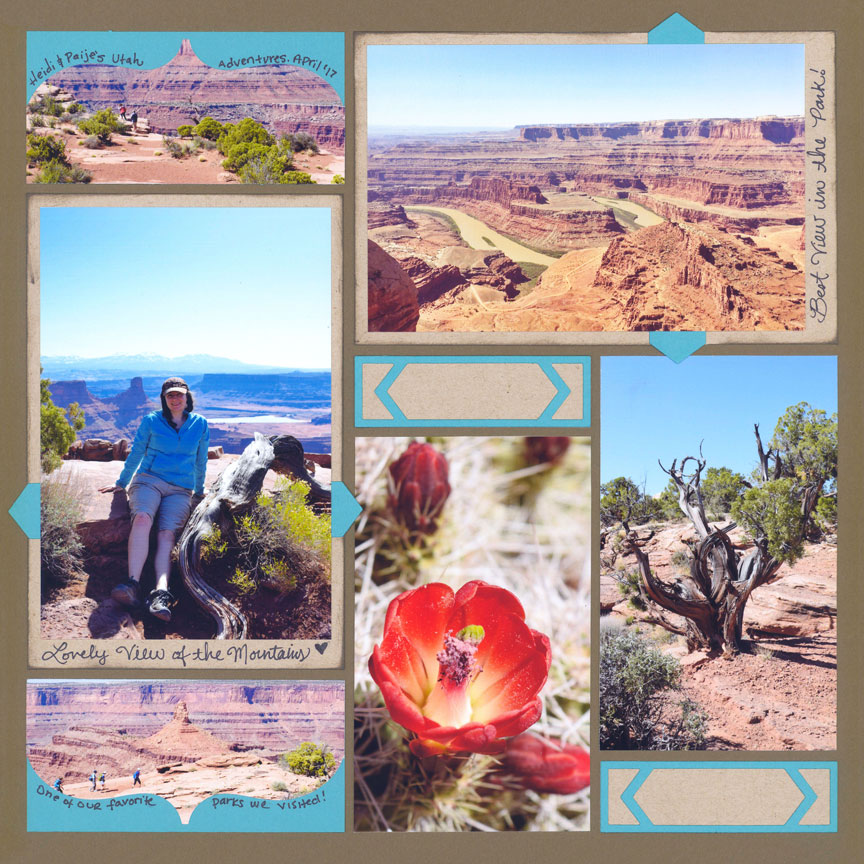
"Utah Adventure" by Paije Potter - Pattern #139
This tip is one Mosaic Moments® will not give you very often. But sometimes one shot with the whole scene of nature is fun!
Get the main scene in one shot - look at top right photo. This is Dead Horse Point and for a simple layout you can show the scene in one photo.
Paije added lots of embellishment details in a bright blue cardstock. You can get a similar look with the Whimsy Die and the 2x3 Arrow Die in a bright color.
Sometimes nature is meant to be taken in one shot. Right?
25. Beautiful Landscapes Make Great Layouts!
Look at these amazing rock formations in Moab! Landscapes are great for mosaics. Look for any of our mosaic patterns on the gallery to use your landscape photos.
Jodi used the Southwest Border Die Set to frame her focal photo. She used a Black 12x12 Grid and Black cardstock which really makes the colors of her photos stand out.
Try a mosaic of a landscape of your own and post it to the group Crop & Share: Mosaic Moments on Facebook.
"Moab" by Jodi Benson - Pattern #282
26. Beautiful Landscapes Make Great Panoramas!
"Lamb's Ear" by Paije Potter - Pattern #315
When you see a beautiful landscape - ALWAYS take enough photos for a panorama.
Nature was made for panoramas! Or maybe Mosaic Moments was made for nature! Either way it's a match made in heaven.
Line up your horizons, Cut with the Strips 1x3.25 Die, and BOOM! You have a great panorama to 'wow' your friends and family.
Paije used the Half Circle Die Set to embellish the top of her layout. She matted her side photos in a bright yellow to match her flowers.
Her page makes you love nature even more. Your landscape panoramas will make you feel the same!
27. Snowy Mountains Make Great Layouts!
Snowy mountains make great layouts! Do not forget to take pictures of the majestic giants in the background of your photos.
Look at how Jodi's page looks magnificent because of the matching mountain pictures on each side of her layout.
She used lots of layering dies from the Layering Bundle for her matted photos and placed them all on the Mint 12x12 Grid of the Fresh N Fruity Collection.
Can't wait to see your snowy mountain layouts!
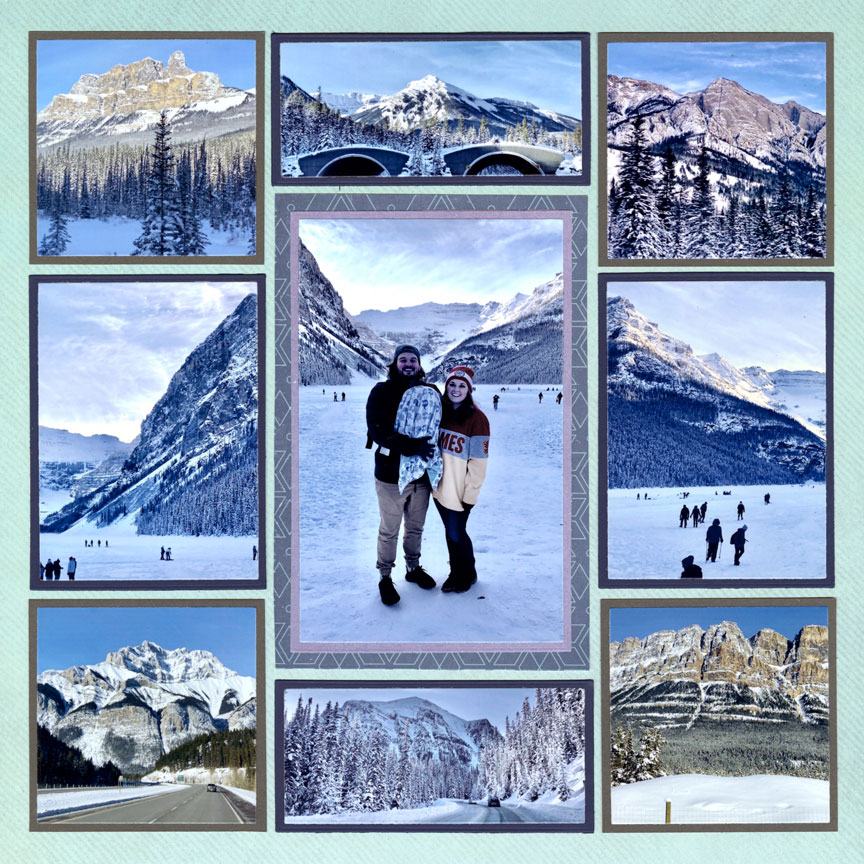
"Canadian Winter" by Jodi Benson - Pattern #477
28. Take Landscapes Vertically!
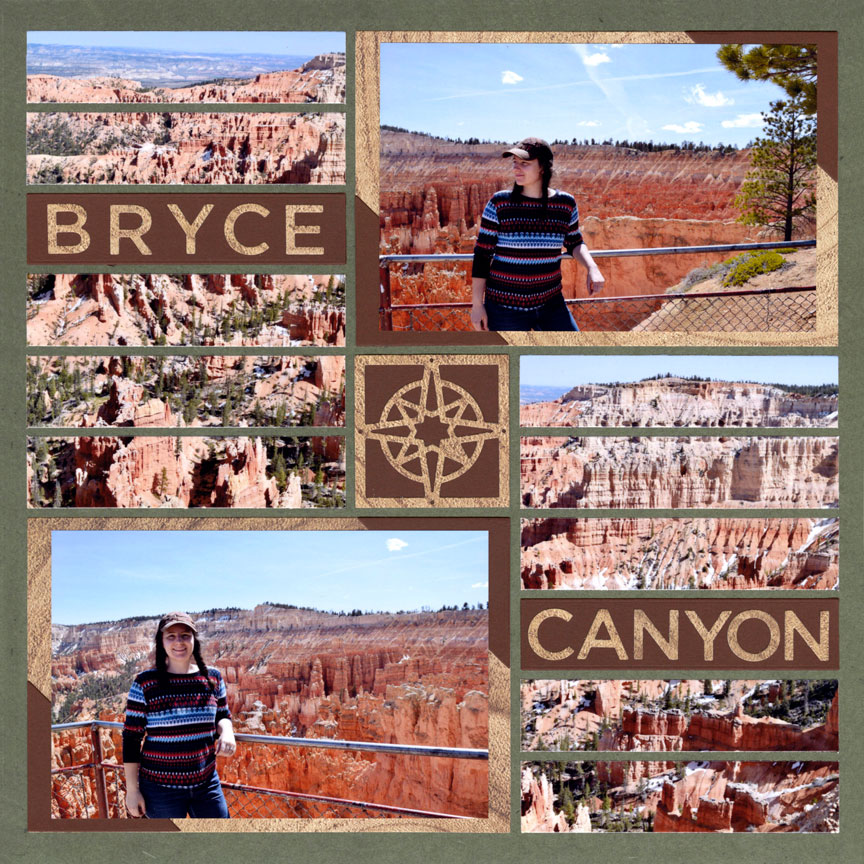
"Paije at Bryce Canyon" by Paije Potter - Pattern #559
Time to change things up! For a different look, take some landscape photos vertically.
Paije made a vertical panorama by cutting her vertical pictures of the canyons into strips. She used the Strips 1x4 Die, Cruise and Compass Die Set , Jumbo Corner Tiles Die, and the Alphabet 2 Die Set on her layout.
Don't you love the idea of taking vertical panorama photos of nature? Try this technique on your next nature page.
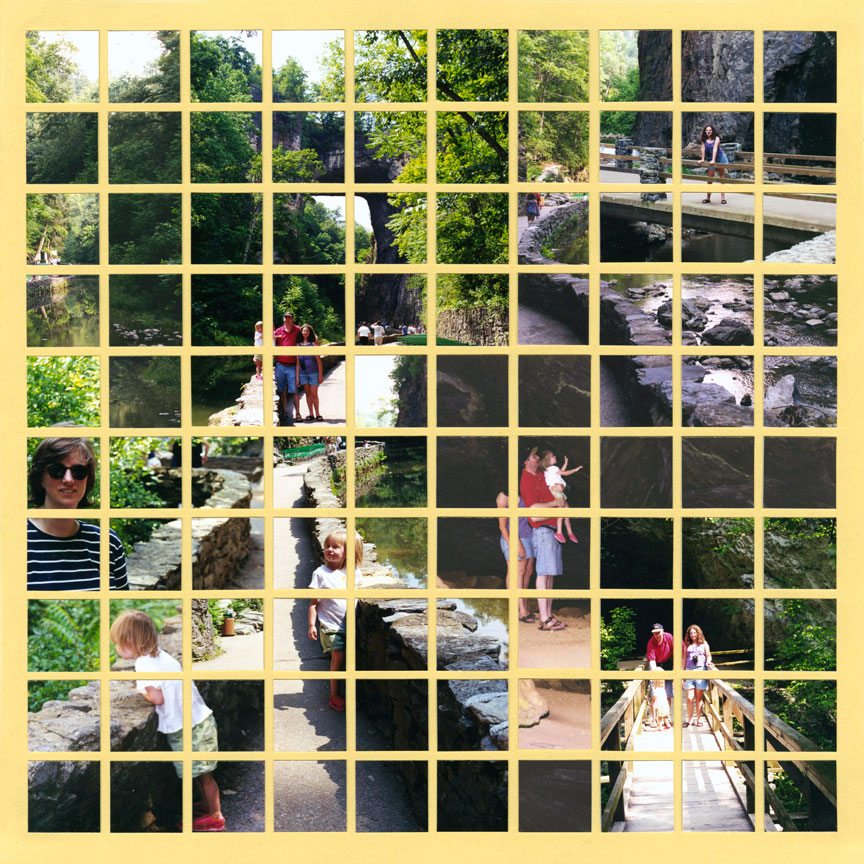
29. Beautiful Landscapes Make Great Layouts!
Blend multiple landscape pics on the same page.
Look at how neat this layout looks with the Corner Strips Die. Jodi also used the Corner Connector Die. Using both these dies made the whole layout look like one big picture. The truth is, it is multiple 4x6s.
Nature was meant to be enjoyed and treasured! Keep making beautiful pages of the places you enjoy. Use these 29 tips for documenting Nature.
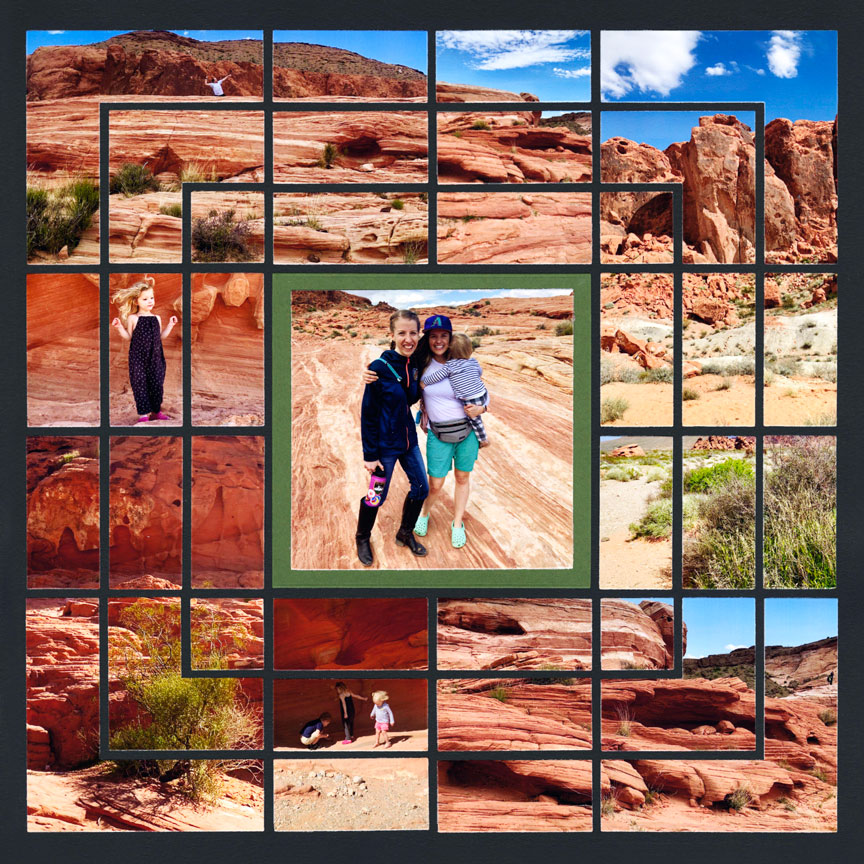
"Valley of Fire" by Jodi Benson
If you are new to Mosaic Moments®, check out www.mosaicmoments.com to subscribe to the weekly email called SnapFix.
You will get the Latest Mosaic Moments® News – Articles & Videos, Great ideas, New Product Releases, Exclusive Coupons, Sale info, Etc. when you Sign up for SnapFix, the Mosaic Moments® weekly e-Newsletter.