
Watercolor for Mosaics by Andrea Fisher
This week I thought I’d like to explore a new medium to incorporate into scrapbooking, watercolors. It’s a new trend showing up in cardmaking and digital scrapping and there are lots of ways for you to incorporate this colorful trend into your Mosaic Moments Grid pages too. Let me show you two ways to get you started.
St. Paddy’s day {yes, it’s Paddy (m.) not Patty (f.)} is just around the corner and it’s always nice to join in the various celebrations. So why not try this watercolor technique to spruce up your pages for any celebrations you may be having?
I have chosen two very easy ways and two different styles with two different backgrounds. All these two by two’s and pretty soon I’ll be loading up the Ark, which is what brings me to my next item, a rainbow! It’s origin is in a symbol of a Biblical promise after the Flood, to never destroy the earth by water again.
Now let’s briefly jump to how it got tied into the Irish! ‘The Irish in the 17th century, understanding how light was refracted, would say in regards to finding the end of a rainbow, “that one was as likely to find a pot of gold as to find the end of a rainbow.” In time the two ideas got joined together and so will often appear in St. Patrick’s Day celebrations often accompanied by a wee Leprechaun!
So set aside the Irish myth for now and make these rainbows a reality in your scrapbooks!
The Paints:
- Although you can use some of the fancier watercolors or my personal favorites the twinkling H2O’s, a simple inexpensive set of watercolors like Crayola’s will get the job done.
Prepare your paper:
- I am using Canson Watercolor Paper 90lb. weight, but any brand will do.
- You may like to cut the paper down to the size that will give you just the amount of squares you will need, or larger to have enough for more than one project.
- I suggest you tape (masking or painter’s tape) the paper edges to your work surface. This will help to control the curl of the paper once it is wet. (learn from my oversite!)
For the First Technique:
- Begin by applying a few drops of water to pool on each of the colors you plan to use to soften them up.
- Use a sponge brush and clear water to lightly cover the page.
- While the surface is still wet, begin with the red, then orange etc. (ROY G BIV: Red, Orange, Yellow, Green, Blue, Indigo and Violet). I chose a sweeping stoke at an angle as I laid down each of the colors in that order, allowing them to blend together. Keeping it wet will help it to blend together nicely. Fill in the entire page up to the edge of the tape.
- Once the page dries, remove the tape. If the page has buckled with the application of the paint, you may want to iron the pages or weigh it down with something heavy. Books overnight work well.
- Cut the page in 1” squares.
For the First Grid:
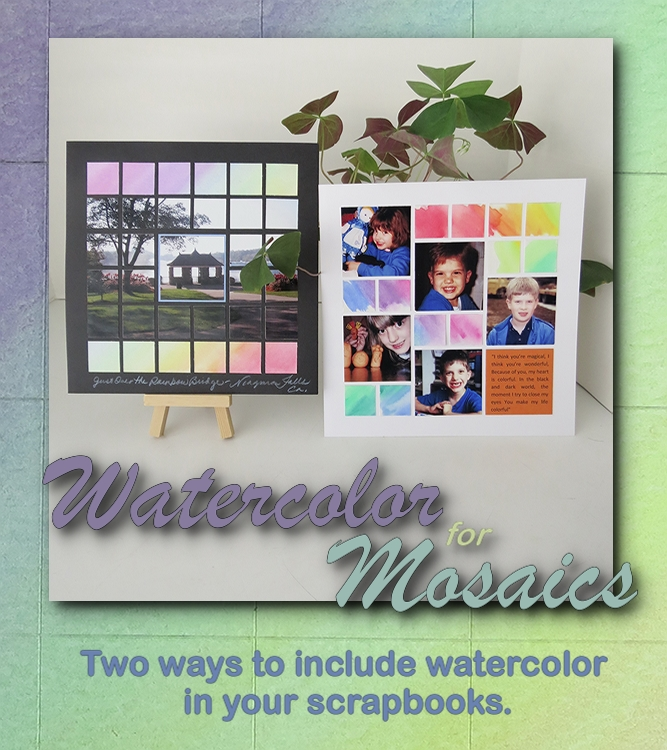
- For this project I took one 4” x 6” photo and divided it into 1” squares, EXCEPT for the very center of the photo.
- I left that photo in a 2” square and mounted it on a 2-1/8”square Mosaic Moments Wildberry Pie Paper Tiles so it would fill the center of the an 8” x 8” Black Mosaic Moments Grid.
- All the rest of the pieces were added leaving only a row of squares at the top and the bottom of the grid.
- From the watercolor paper I used the top row and the bottom row to fill those squares in. Use a strong adhesive as the watercolor paper is heavier than your regular cardstock paper.
photo: ‘Just over the Rainbow Bridge,’ Niagara Falls, Ontario, Canada
This leaves three rows of watercolors to use on another project. Doing it this way allows for the illusion that the rainbow pattern continues from the top to the bottom.
For the Second Technique:
- I took another section of paper and wet it down as in the first example. I let it dry. I began laying in the colors in shorter strokes close to a square shape. This time I made the colors a bit more intense by using less water and filling the brush. You can see in the photo above, the first two columns of colors are drier than the last two.
- I worked quickly to get the colors laid and blended from color to color. I worked in columns red, orange, yellow then yellow, green, blues, and another with blues to purples.
- Again, allow to dry, iron or weigh it down to flatten the page if it’s needed. Cut sections into 1” columns and create squares as needed.
For the Second Grid:
- I used a White 8”x 8” Mosaic Moments Grid
- I chose photos of my 5 kids and printed and cropped them to 2.125”.
- I arranged them in the spots I wanted them to appear.
- I printed a quote on a paper tile and placed it in the corner.
- I randomly placed the various watercolor tiles in the blank spots. Use a strong adhesive as the watercolor paper is heavier than your regular cardstock paper.
The quote was one my daughter provided trying to inspire me on this project. I couldn’t decide what photos to use and once she sent this on…and I checked the source…one of the K-Pop groups some folks around here have been following, I decided I’d do one with photos of the kids when they little, trying to get them all around the same age. This will be one of our inside jokes!
Here’s the quote: “I think you’re magical, I think you’re wonderful, Because of you, my heart is colorful. In the black and dark world, the moment I try to close my eyes, you make my life colorful.”
If anyone has added color to my life…it’s been my kids. They are my rainbow; they are my pot of gold.
If you have hesitated to venture into the area of watercolors, I hope this shows you how easy it can be. Give it a try, it won’t cost a lot to do and be sure to show us the pages that you complete, either on our Facebook page or over at the best spot around for sharing your creative works of art, www.journella.com.
Be sure to stop in again next time as I keep playing around with some colorful ideas for your scrapbook pages this spring. These are some of the things giving me ideas! How about you??
Thanks for stopping by…andrea