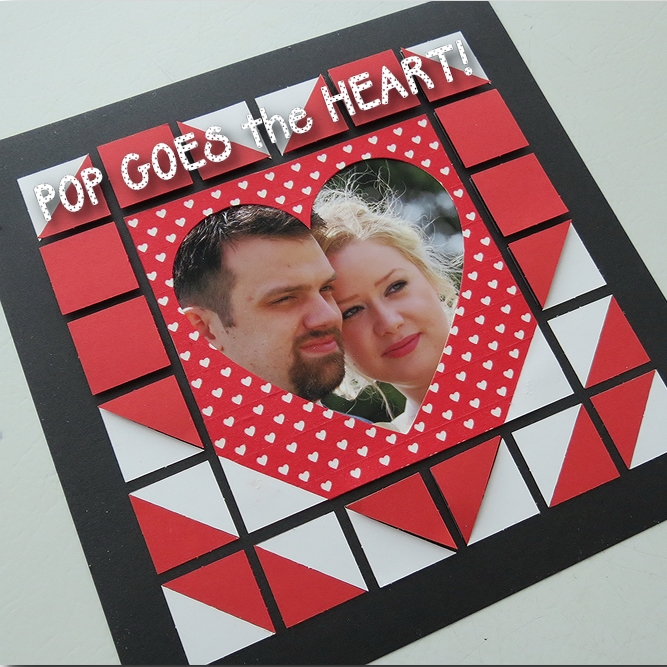
We have a couple of brand new products at Snapncrop.com that are perfect for a quick gift for that someone special on Valentine’s Day, or any special day!
Let me show you a quick way to personalize our new Heart Frames and to use our corner tiles to accentuate the design.
Here’s my material list:
- 1-8”x8” black Mosaic Moments Grid
- 1-pkg. red Corner Tiles
- 1-pkg. white Corner Tiles
- 1-pkg. of red Paper Tiles
- 1-pkg. of White on Orchid Heart Tiles
- 1-roll of red with white heart Washi Tape
- Foam mounting squares
- Adhesive dot runner
- X-Acto Knife
Here’s How I put it together:
- Beginning with the largest heart frame in the pkg. I centered it on the 8”x8” black Mosaic Moments Grid
- I placed the tiles around the frame to create a heart to frame the frame.
- Then using foam mounting squares on only the red tiles that make up the heart shape to create a raised heart.
- Then the heart frame was prepared. Keeping the inner heart shape in place I tacked them to my cutting mat so they wouldn’t move.
- Then corner tiles were added (lightly tacked) to the lower corners of the frame, because I wanted the heart shape to continue. Once trimmed it will give me two heart corner tiles to use on another project.
- The Washi tape is easily applied and it’s even easy to adjust if you are off just a bit as you line up the edges, row after row. Trim each row with an X-Acto knife as you go and line up the pattern if you can until completely covered.
- Use the X-Acto knife again to carefully trim the heart out of the center of the frame. It’s easy to see the line, just take it slowly. Now I have another heart to use in another project without a lot of waste.
- Now the photo gets centered in the frame, trimmed and adhered to the center area of the popped heart. Voila! You have a complete project and it hasn’t taken all day to do!!
Thanks so much for dropping by…
Andrea

