

We’re going to look at ten cards for Christmas this week. Christmas will soon be upon us and part of getting ready for the big day is sending greetings to friends and family with an annual Christmas card.
Most years have found me making my own cards as well as making cards for others. Stamping images are still popular, but dies have been making their way into my collection and now, making a mosaic style card with our many dies can also be quick and easy to do!
Let’s look at a few ideas using dies from each of our Die Levels to create ten cards for Christmas with our Grid Greeting Cards.
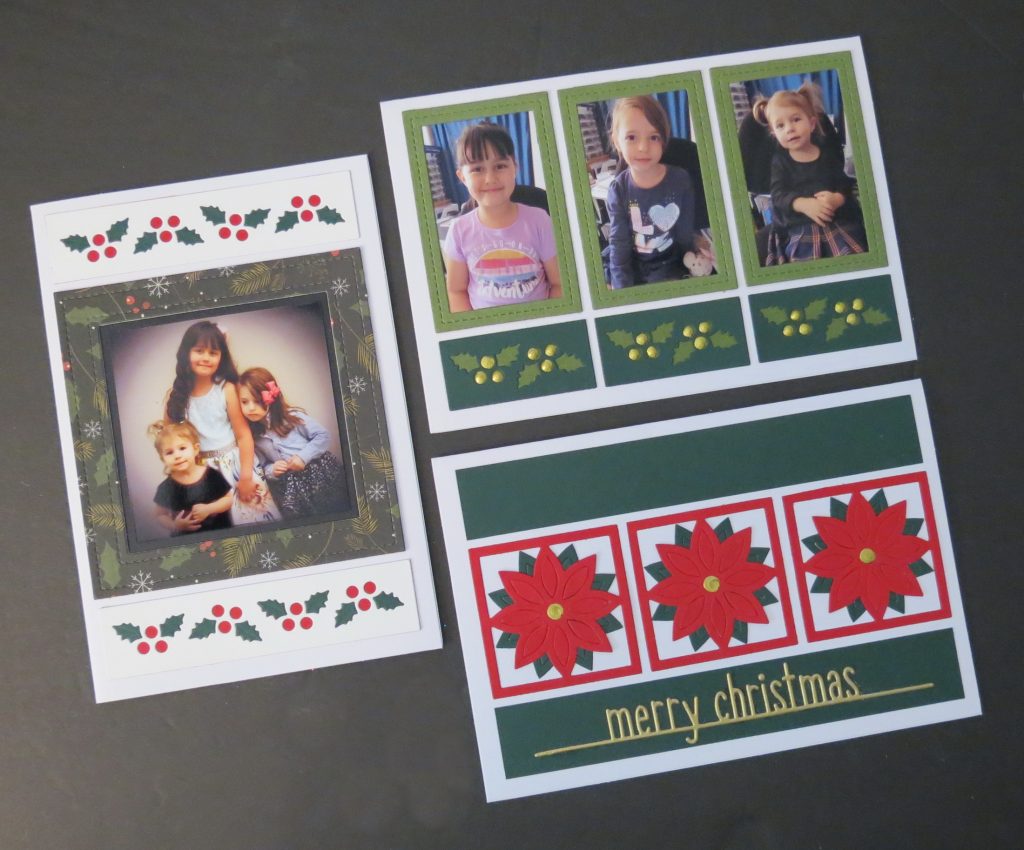
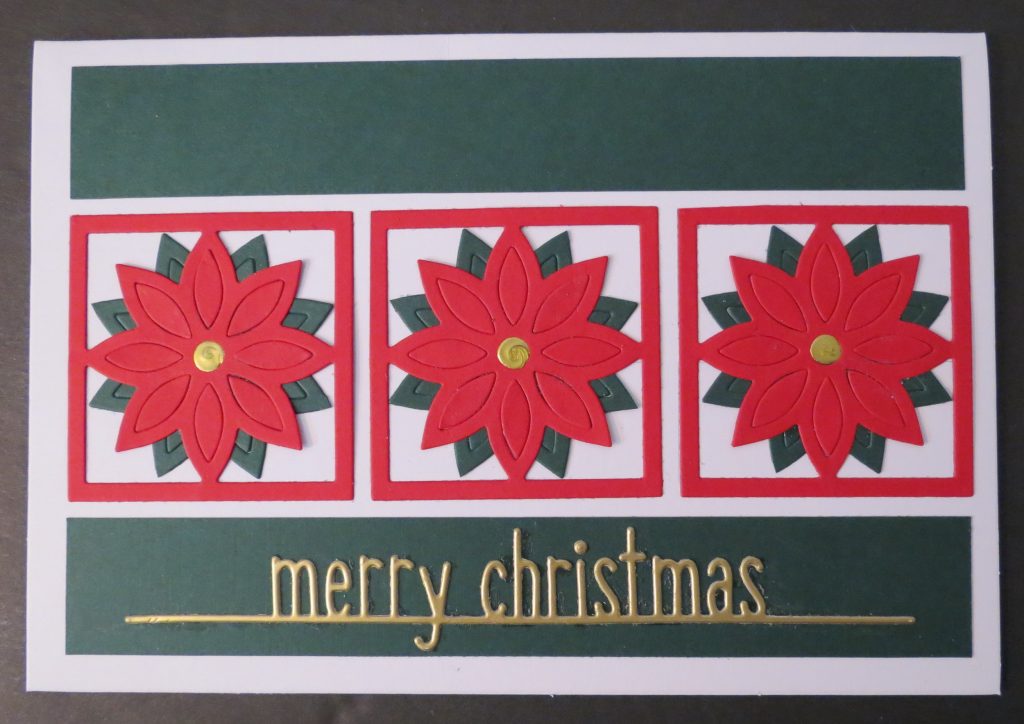
Card One
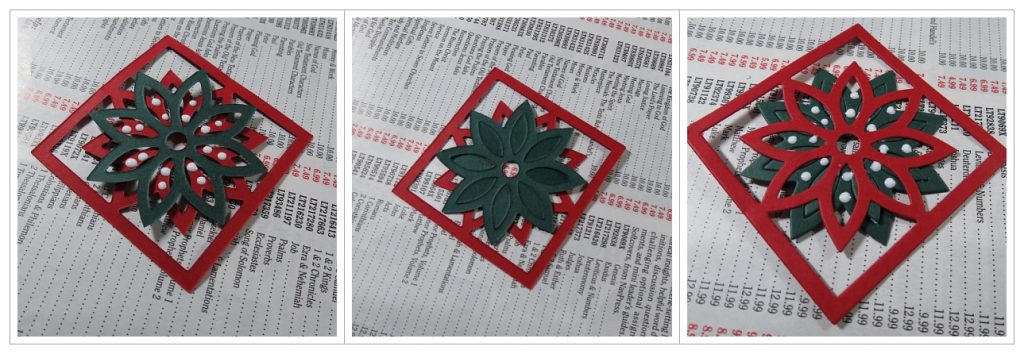
Using the Star Flower Die set cut three in red and three in green. Next, trim the frame away from the green flower pieces creating a point on the petals.
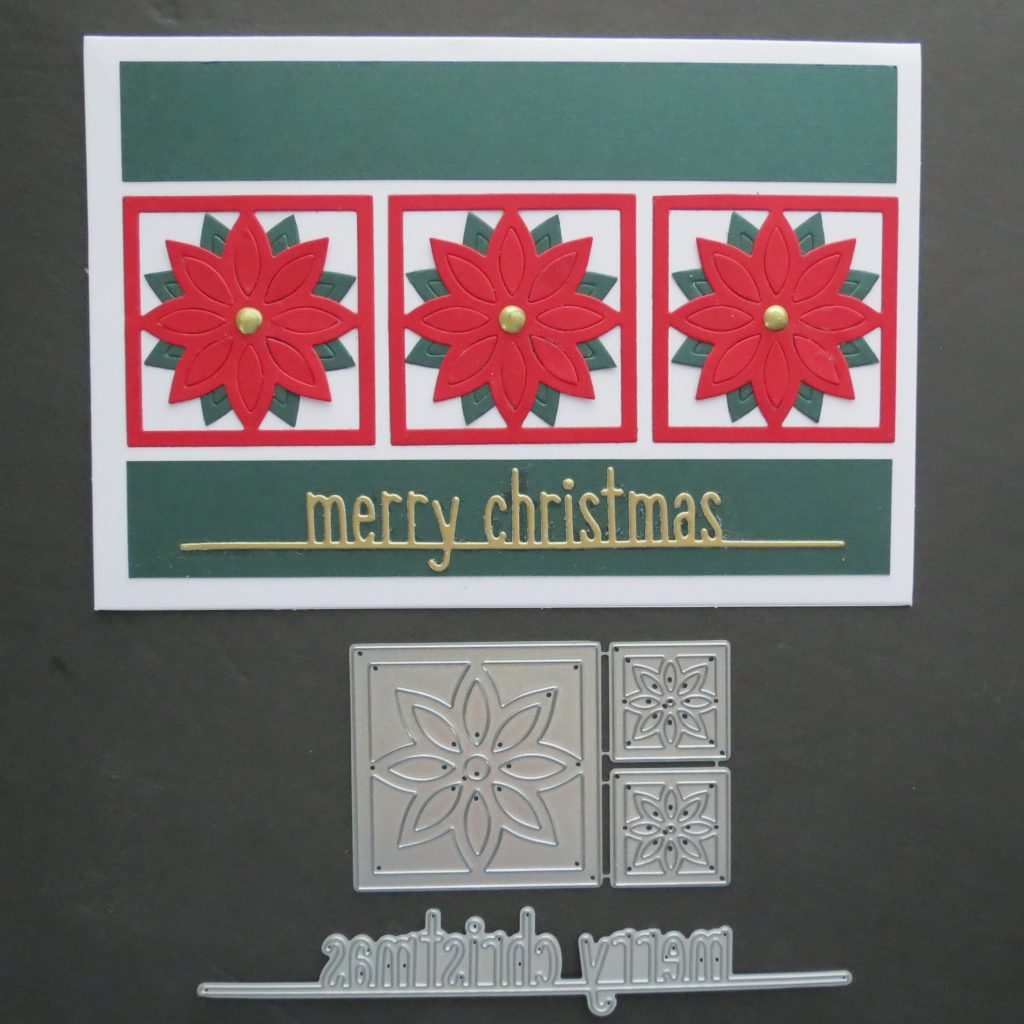
Attach the green flower to the back of the red so that the green petals fall between the red petals, like leaves. Working from the backside attach the green petals by using a bit of liquid glue to the red frame of petals.
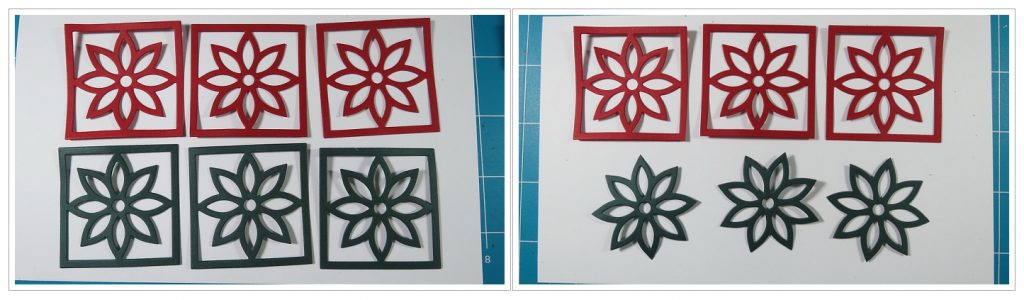
Turn to the front and apply glue to the green petals and drop the red petals back into place. Add Nuvo Drops in Gold in the center of each flower. Adhere the red squares in a row in the center of the card.
Add a strip of 1×6 green at the top and bottom. And finally, finish the card with a cut sentiment strip (I used Lawn Fawn – Merry Christmas) and apply. I used gold metallic cardstock for a rich finish.
Card Two
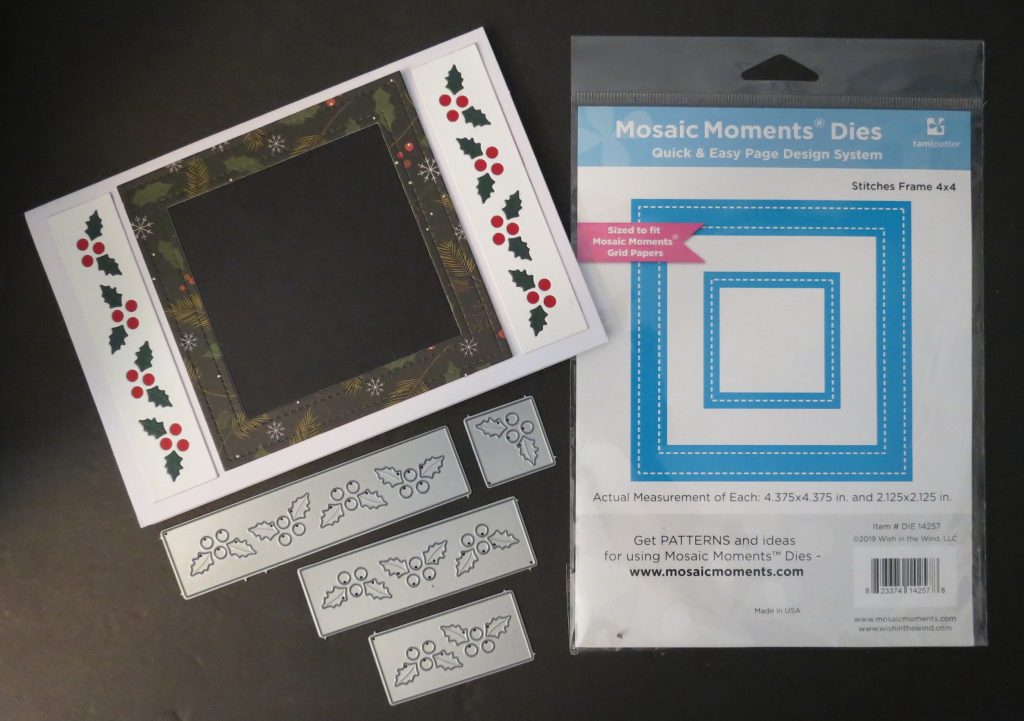
This is one way to incorporate your annual family photo to be included in your Christmas card.
This time I’m using the square stitched frames dies 4×4 size, and the Holly Border dies. I’ve layered the frame die so that the photo can be recessed. Using a patterned print on black paper draws your eye right to the photo. I’ve placed a black square within the frame so that the photo will have an additional mat framing it. This gives a dramatic look to your card.
Because you need a square photo, your card can either be horizontal or vertical!
The holly borders are cut in white to appear to blend into the card base, and the holly and berries are inset pieces.
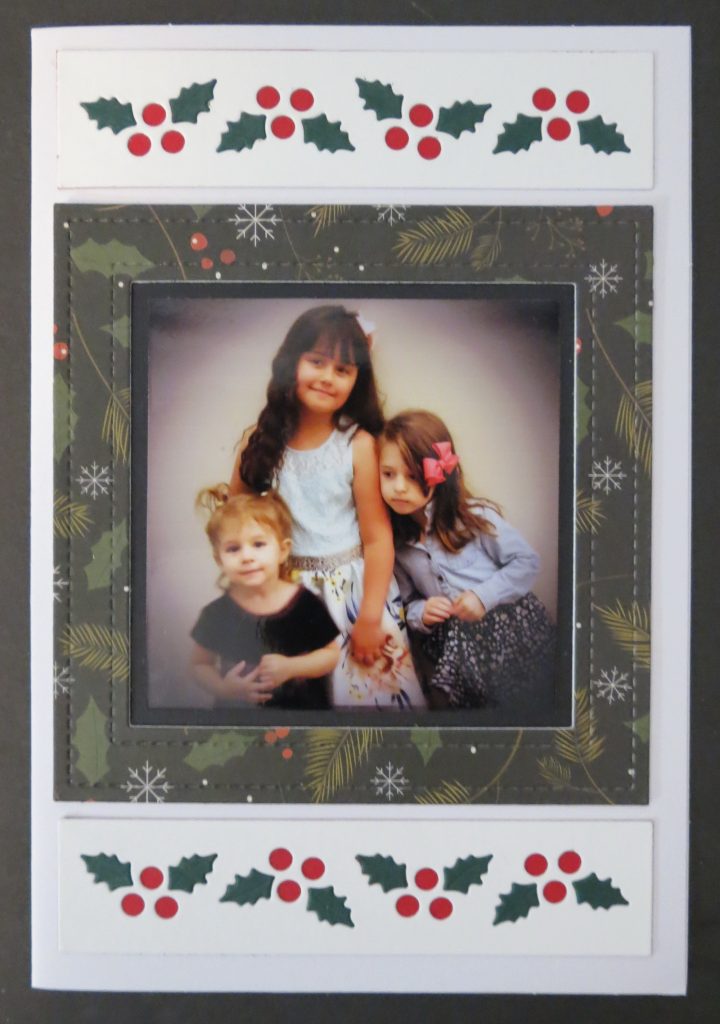
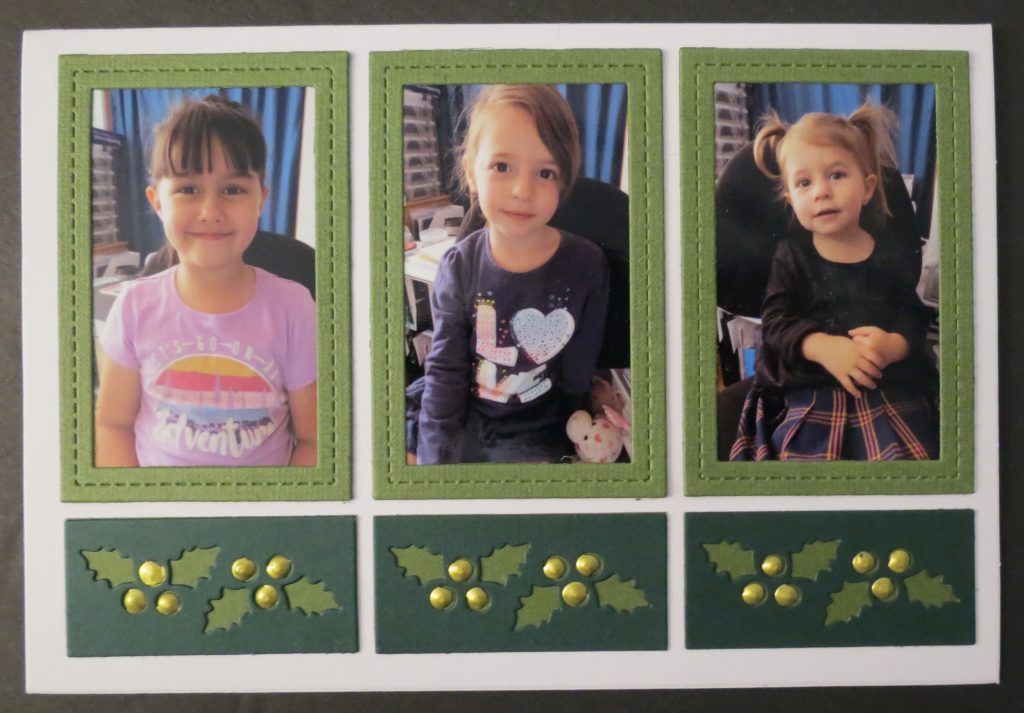
Card Three
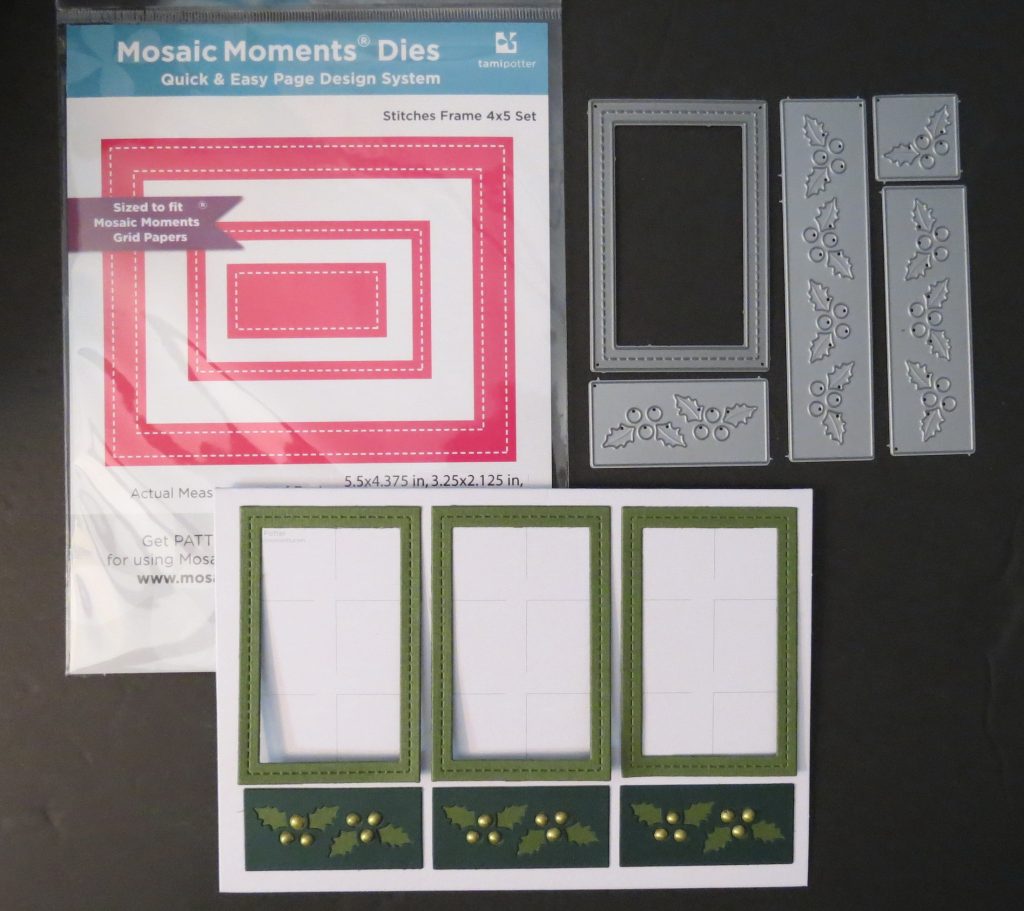
This too is a photo frame option. This one works well for the three children I want to feature. Using the Stitches Frame 4×5 Die Set, the 2”x 3” die. I’ve cut three in green. I’ve also cut three 1×2 Holly Border sections in a darker green then used the same green of the frames to back the die sections. A final touch with gold Nuvo Drops to fill the berry sections.
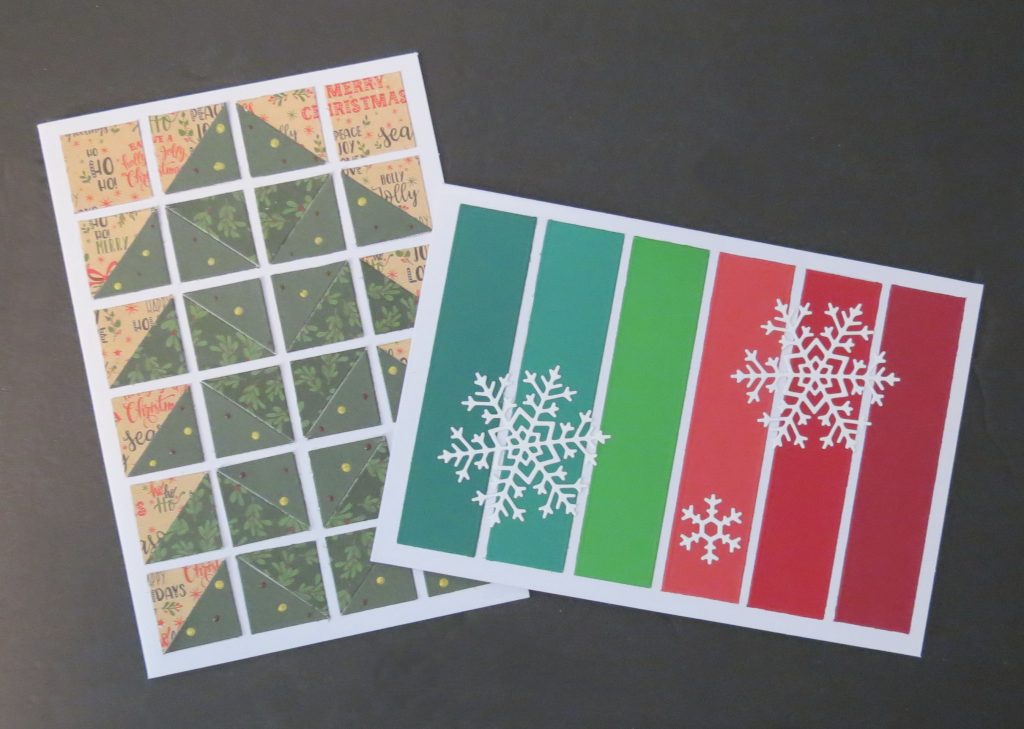
Card Four
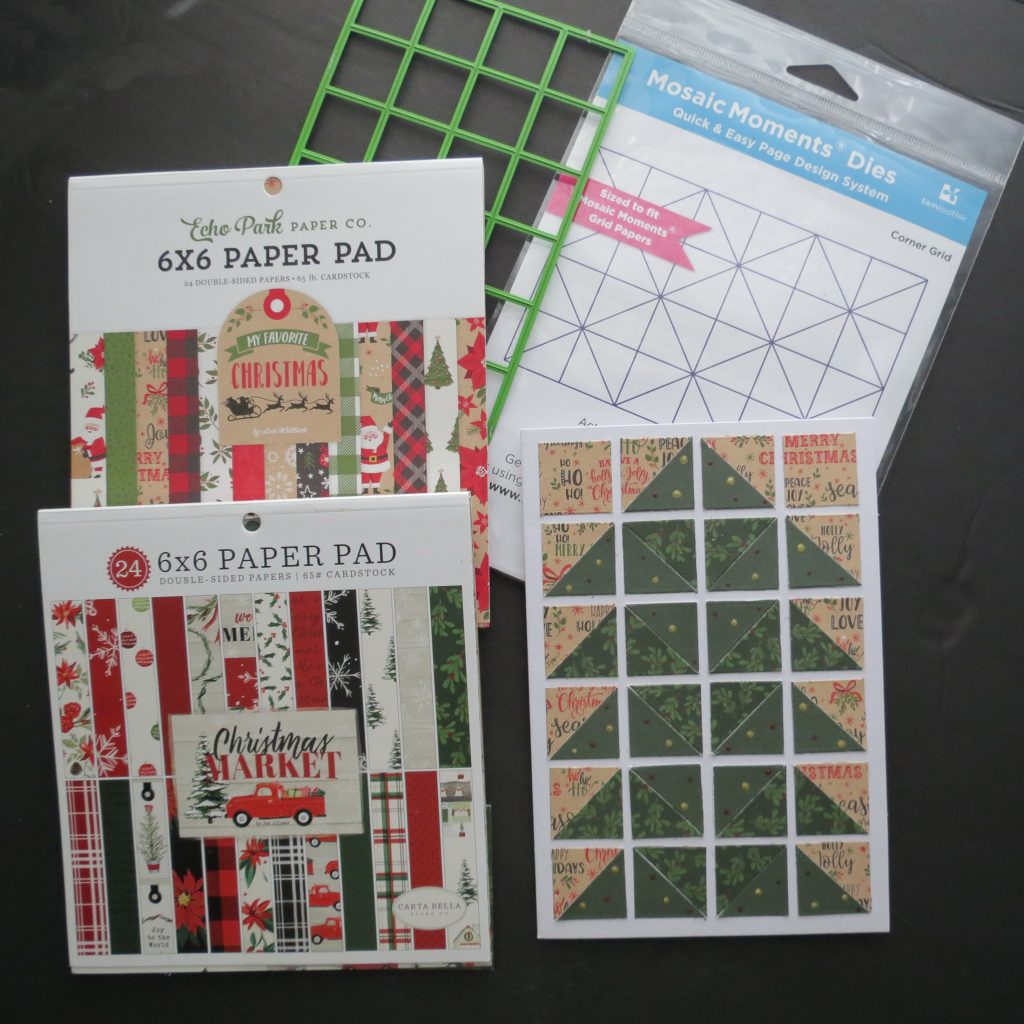
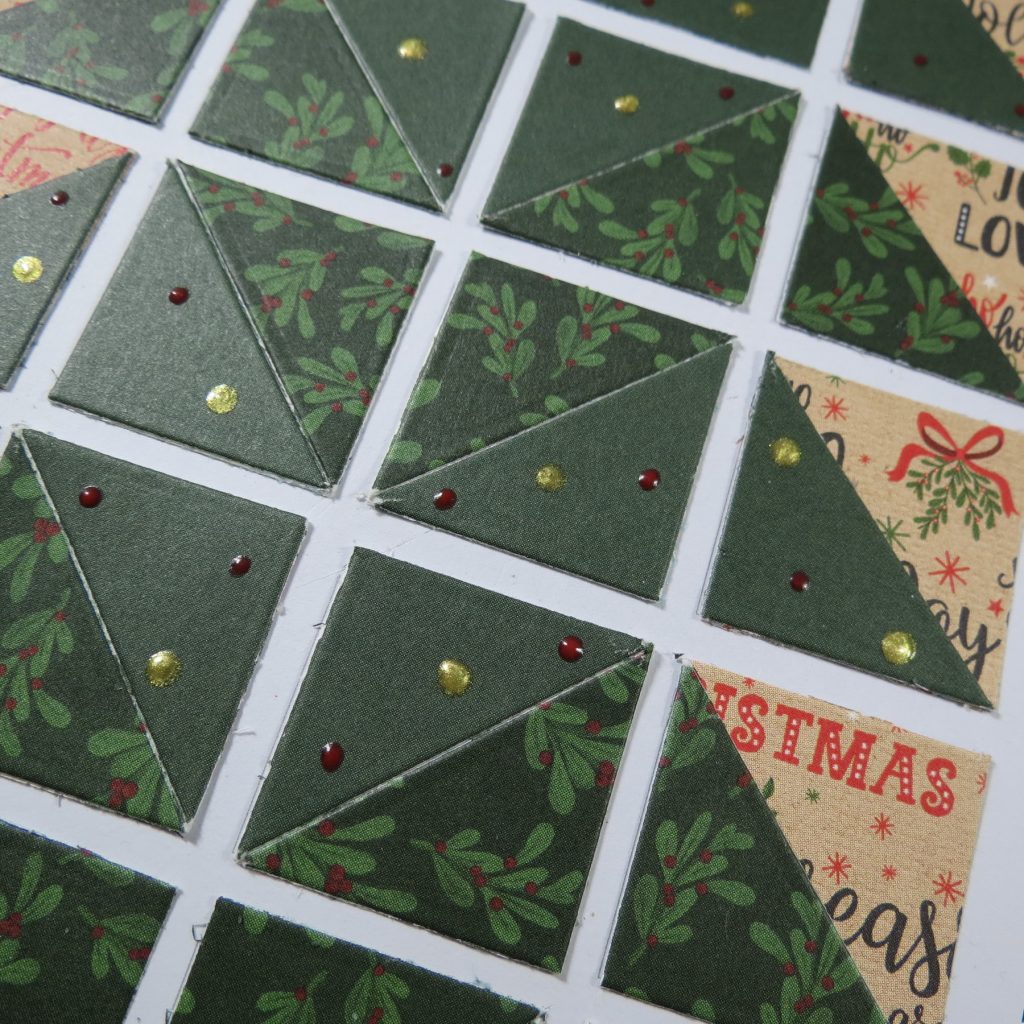
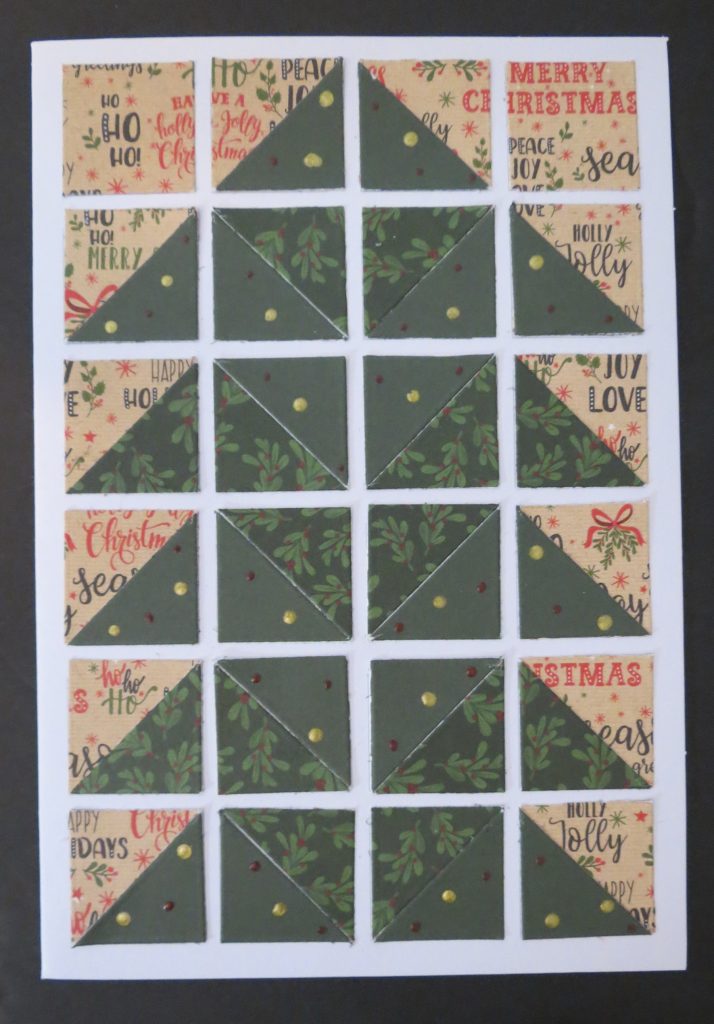
This card will use the Corner Grid 4×6 Die and the 1” Grid 4×6 Die to cut three patterned papers for this stylized tree. Two greens, a pattern and solid, will form a zig zag chevron pattern for the tree and the word patterned paper will provide the contrast and the sentiments.
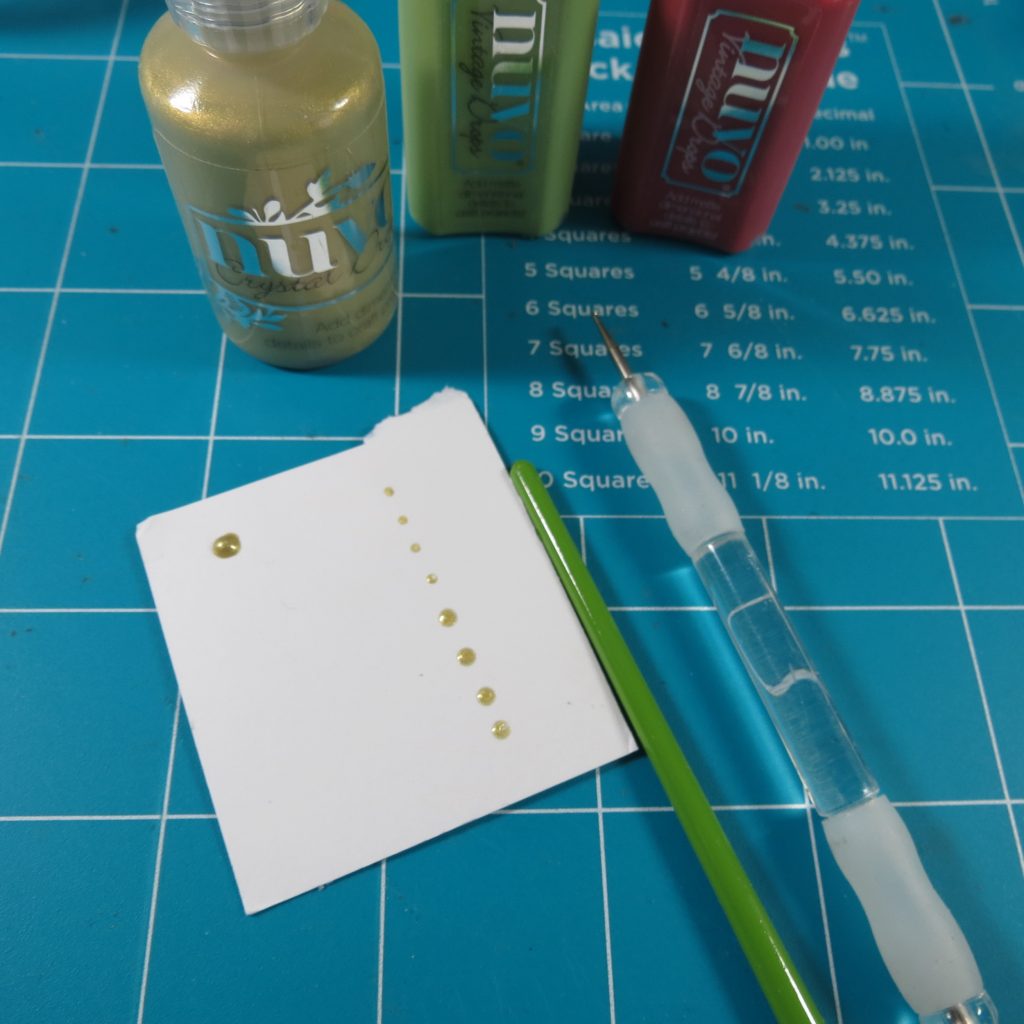
On the solid I have added Nuvo Drops in Gold and Vintage Postbox Red. For a nice uniform size, I used a stylus and paintbrush handle to dip into a small amount of drops I have on cardstock to work with and then dot the tree. If any spot looks a bit too light, just repeat the process and randomly place them throughout the solid green sections, like ornaments on a tree.
Card Five
This card is great if you want to create multiple cards at once. It is easy to mass produce and you can have several options for finishing touches. This card can be displayed vertically or horizontally.
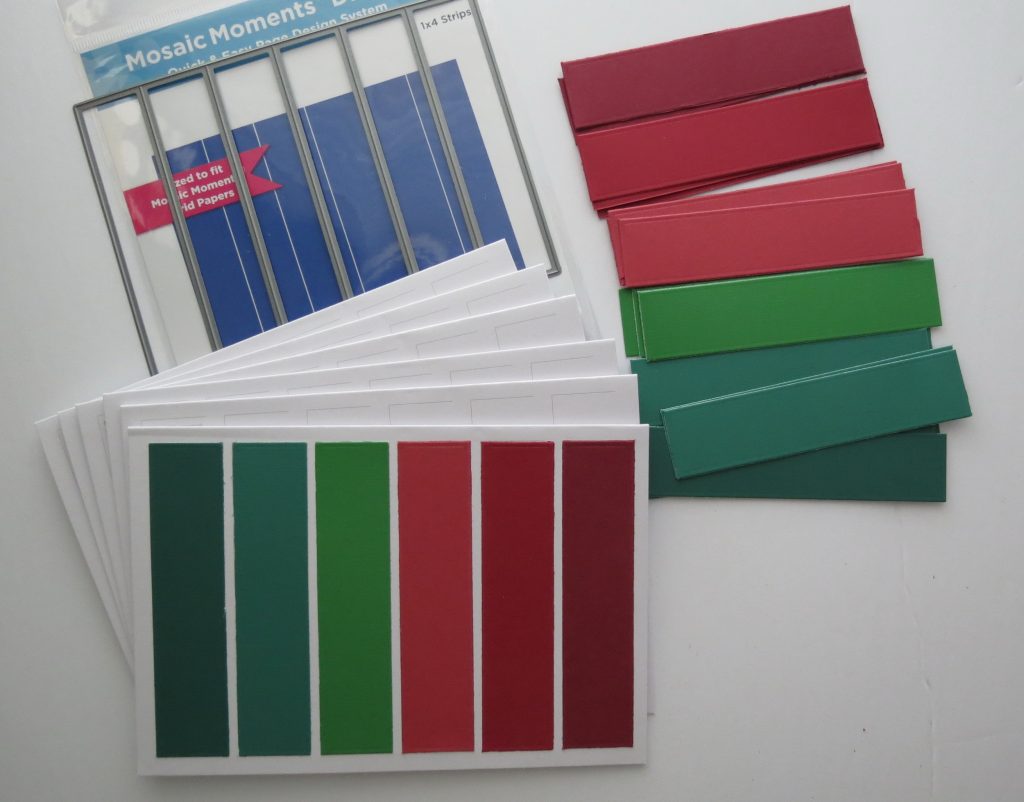
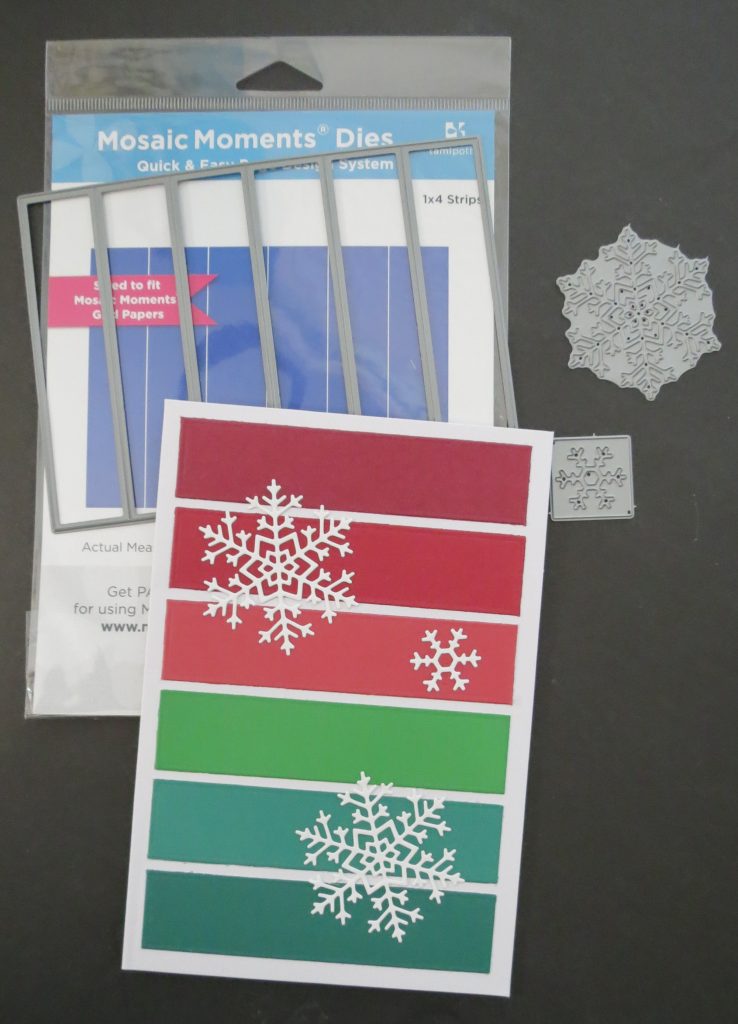
With a blend of colors, I’ve gone with three greens and three reds, and the 1×4 Strips Die, cut strips from each color. Place one of each color on each card.

For snowflakes I used the freestanding flake of the Snowflake Set 1 and then from the 1” snowflake from the Mr. Snow and Flakes Die Set. I used liquid glue on the back of the flakes to adhere.
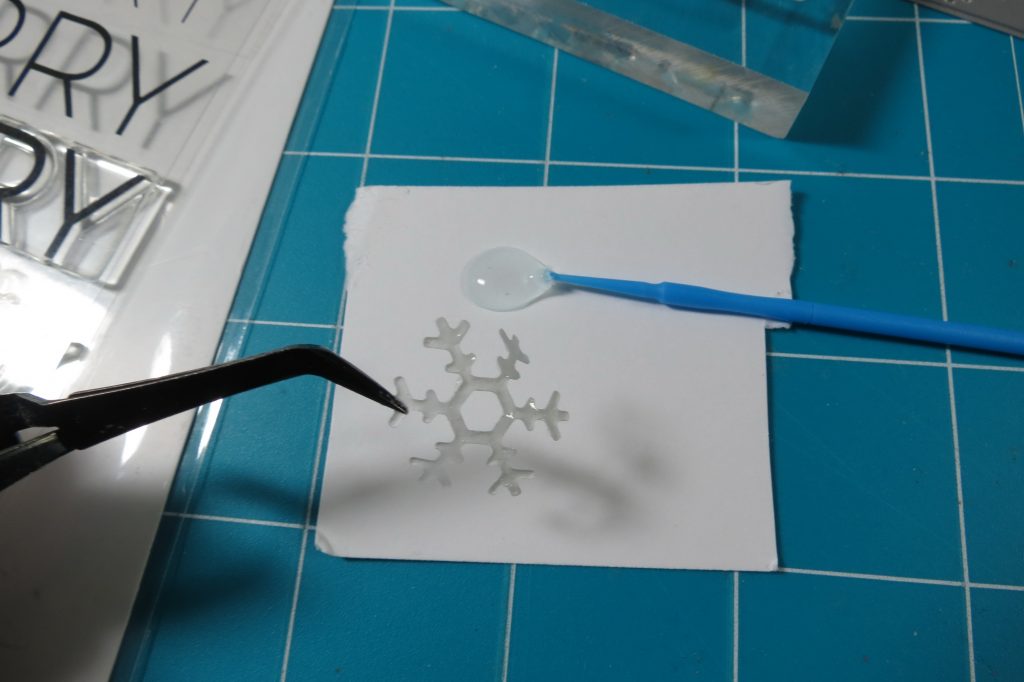
Because it is so narrow, I have found that a small applicator brush is an excellent way to spread the glue evenly so that the oozing of glue after placing on the spot doesn’t spread all over your project. (The little blue disposable Mini Adhesive brush is available from Simon Says Stamp in a container of 100.)
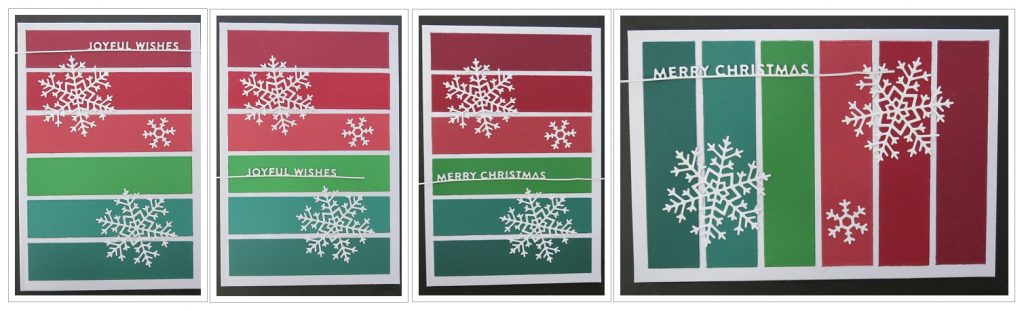

This card can be used as is with just the snowflakes or add a sentiment. I’ve placed them on the card to give you an idea of how they can be used, just trim to fit your space. This set is Holiday Words on a Line by Simon Says Stamp. Simple options to vary the look on multiple cards, perfect for variety and quick completion.
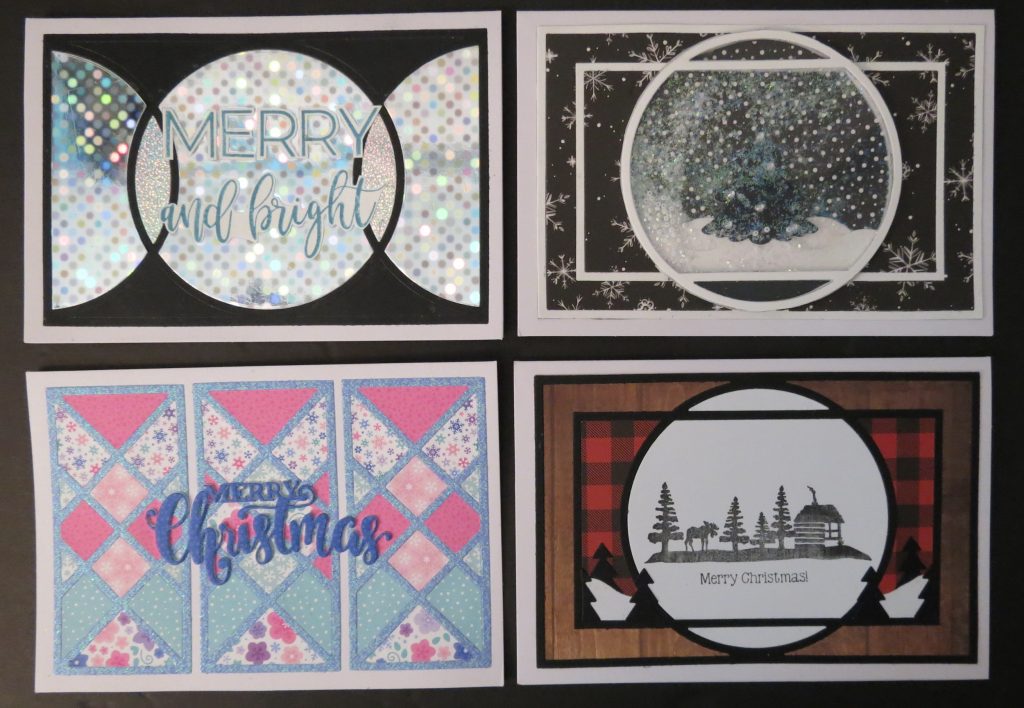
Card Six
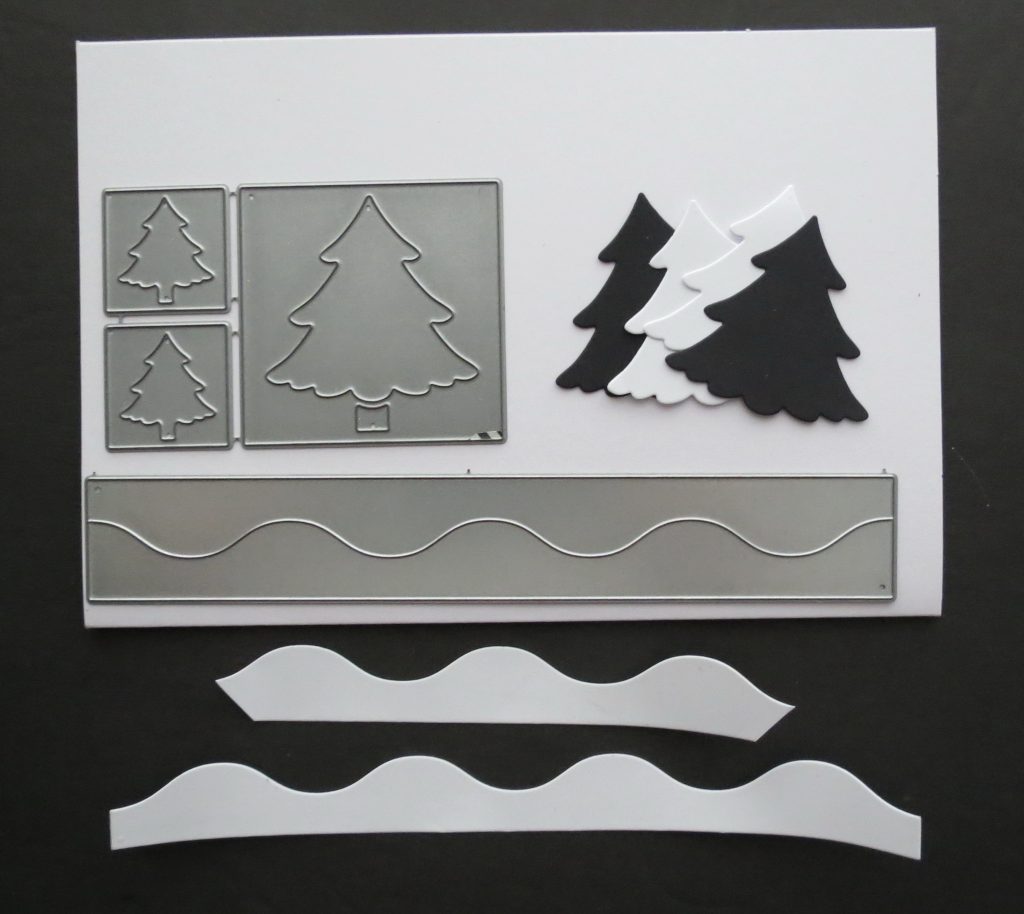
The Daybreak Die is my choice for this card incorporating stamping and layering techniques. Patterned papers with a woodland theme frame out my center circle. This center circle is just right for my stamped image.

I created my snow banks with the Wave Border die and fit it into the edges. I cut the Forrest Border die in black and used only the “outtakes”. A light coating of Nuvo Glitter Gloss on my snow banks.
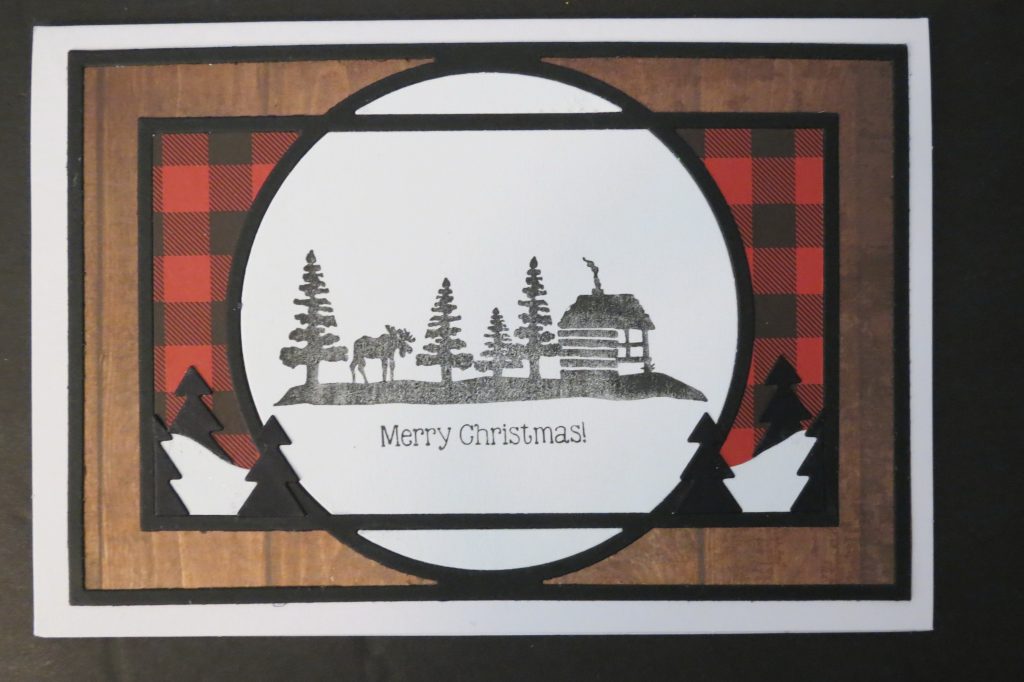
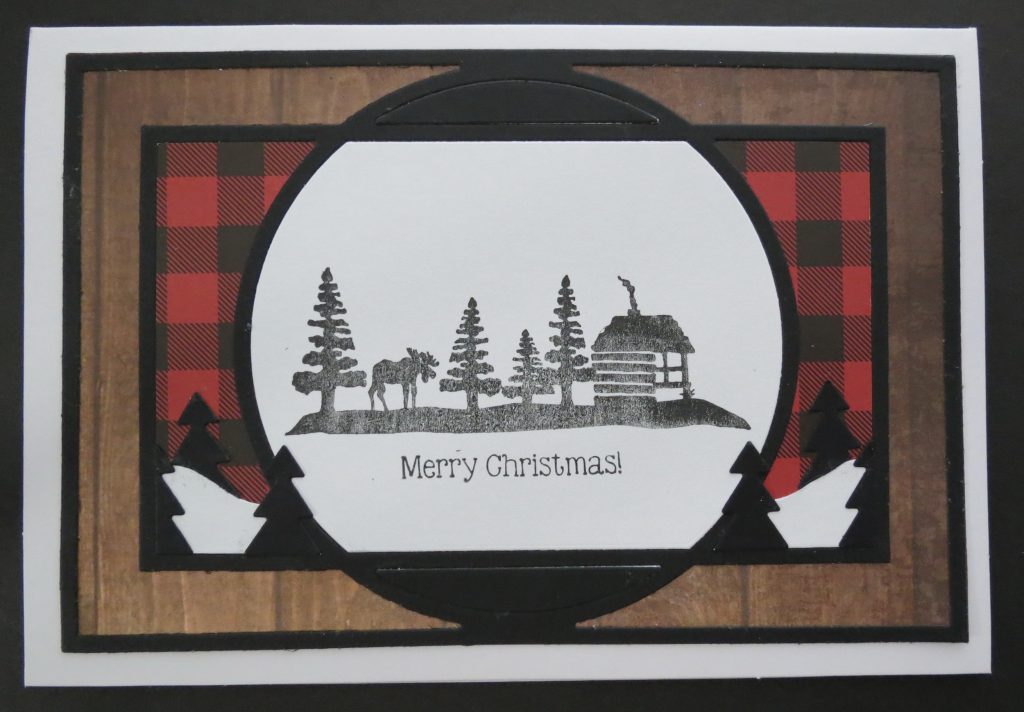
As an alternative look, I reinserted the black top and bottom of the Daybreak circle.
Card Seven
I thought the Daybreak die was perfect for creating a shaker card. Layers of the circle section of the die and 1/8” strips of foam mounting tape will give all the lift it needs to contain a layered Fir Tree with gems. Adding glitter, tiny clear disks and seed beads to the container. I should have lightly wiped the acetate window with static release, but forgot and everything clings to the surface. More snow banks are created and glitter added to the edges.
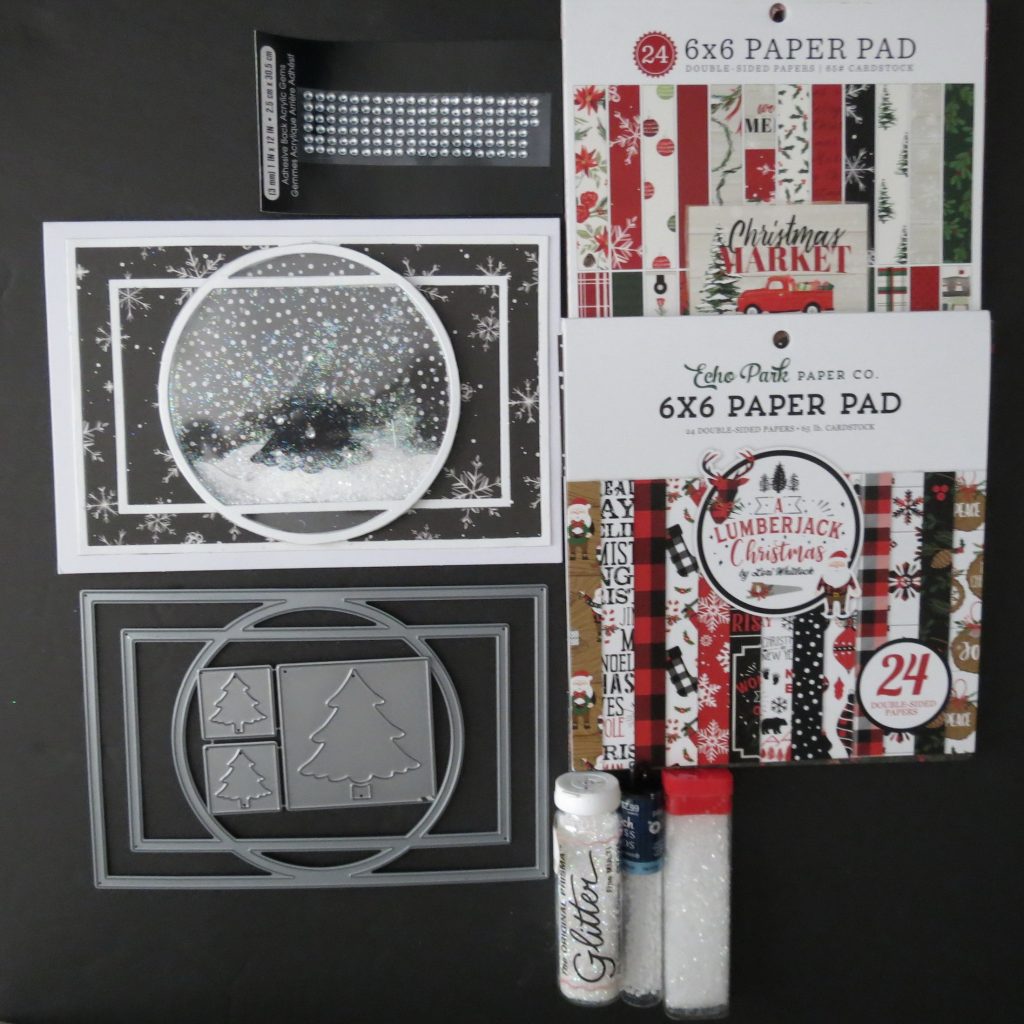
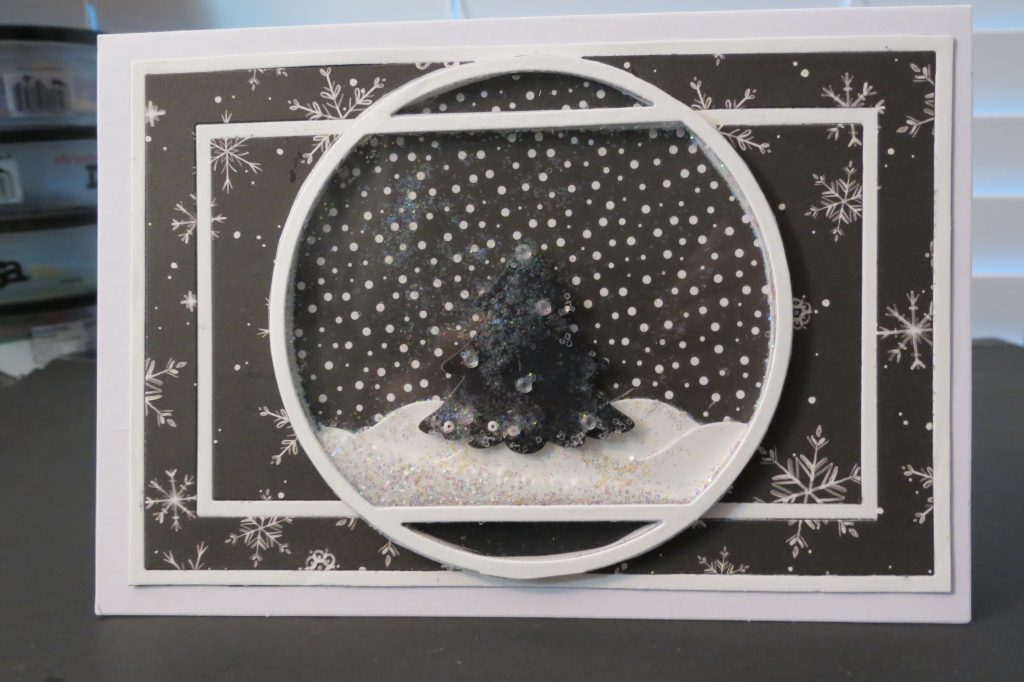
This black and white card is a bit unusual for a Christmas card and it isn’t an easy one to make multiples, but as a special card for a few, this might be something you’d like to try with your own color choices if you aren’t a fan of the black skies and trees.
After completing this card I discovered that Black Christmas Trees are on Trend for this year! Who knew?
Card Eight
The Charmed 4×6 Die stars on this card. Again, black and white for Christmas is unusual, but holographic mirror card adds a festive touch, picking up a multitude of colors. The three larger sections all have the larger dot pattern, while the intersecting section has a tighter pattern paper.
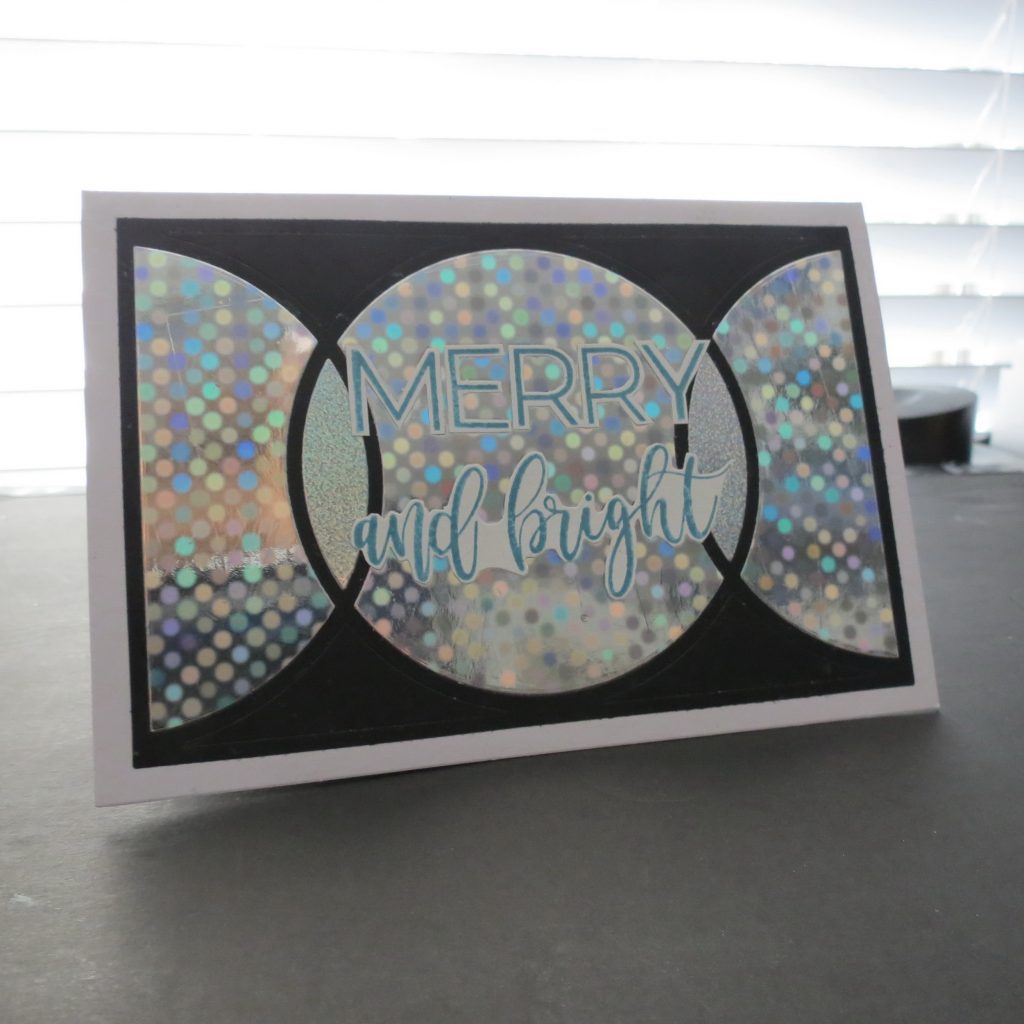
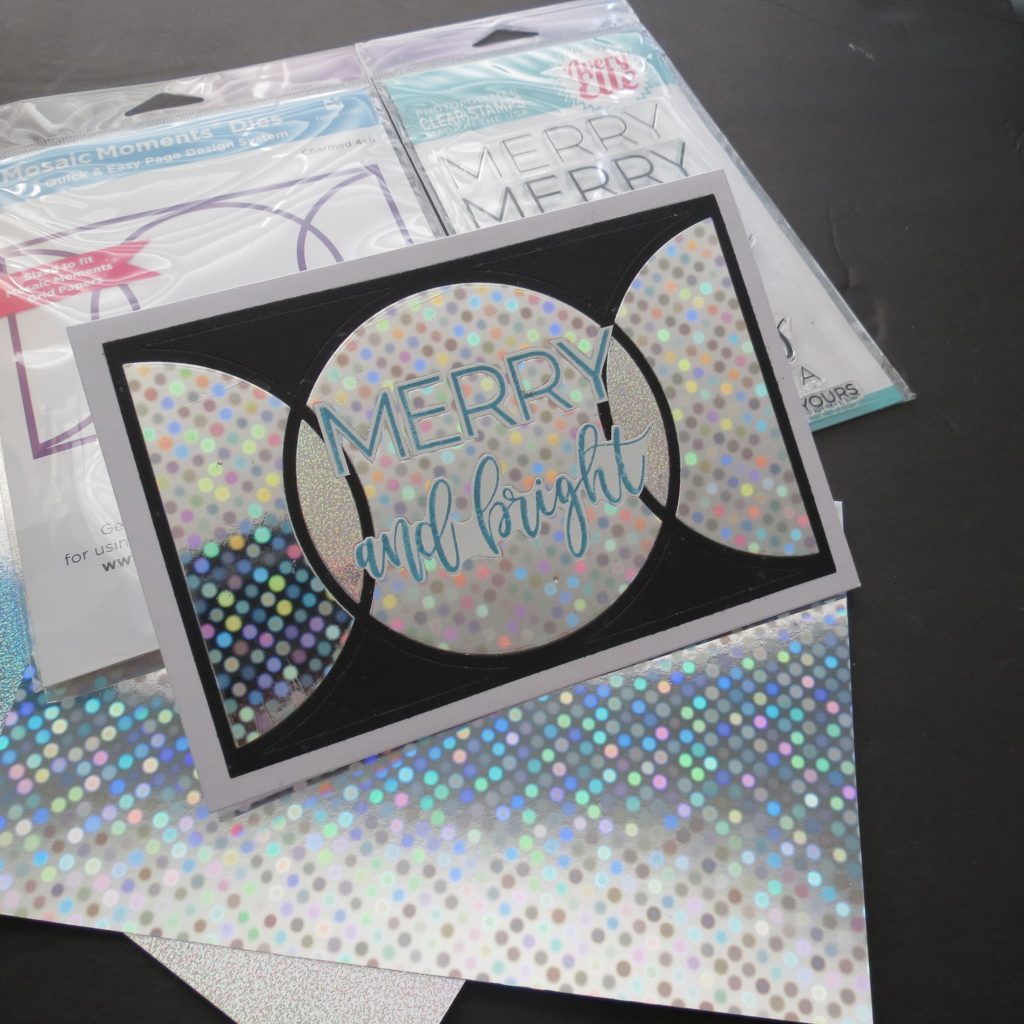
Avery Elle Stamps are my stamped greeting, fussy cut and glued down. I ran this through the die cut machine and it flattens my sentiment into the paper.
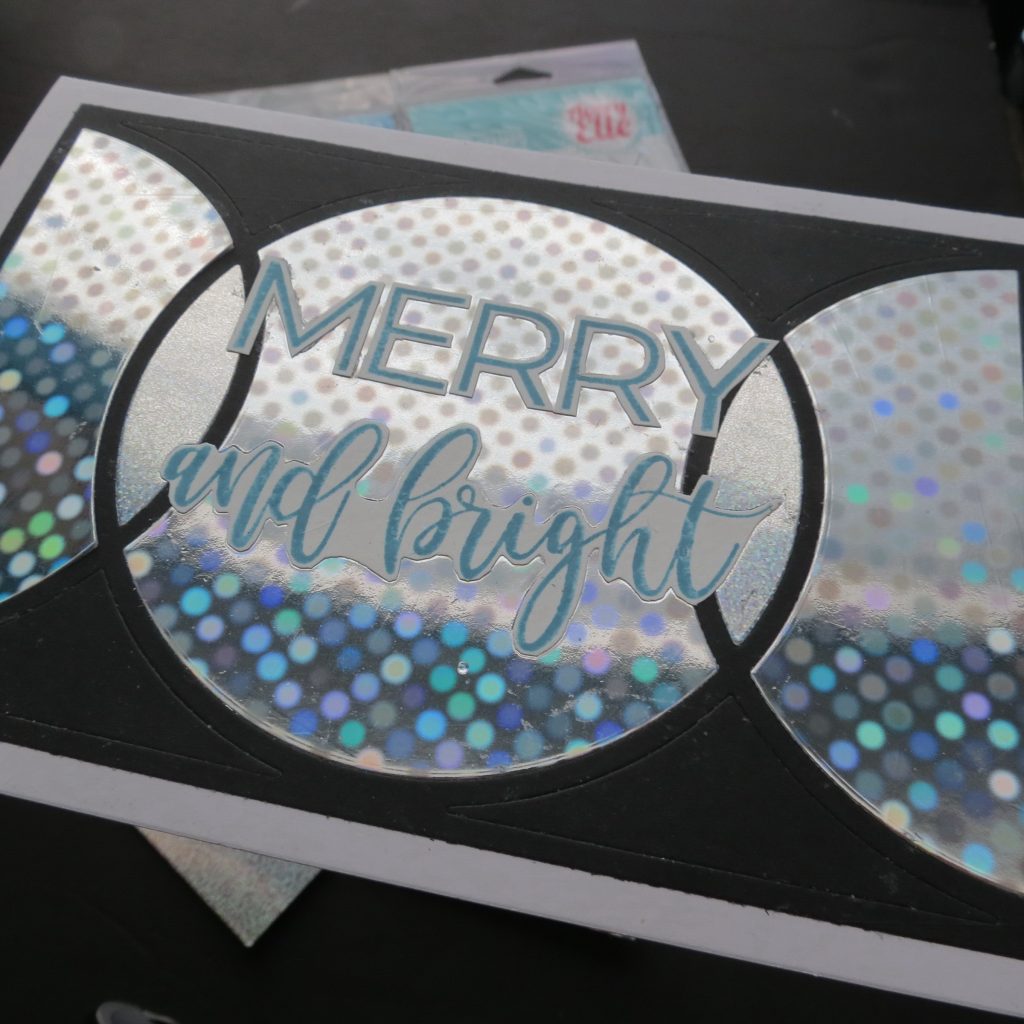
That changing glittering image (without the mess of glitter!) makes any holiday Merry and Bright!
Card Nine
Doodlebug Designs patterned paper from the Winter Wonderland Collection will fill in the many spaces created with the 2×4 Double X-Factor Die cut in glitter cardstock also from Doodlebug Designs. This wintery snowflake patterned paper gives a nice homemade quilt look.
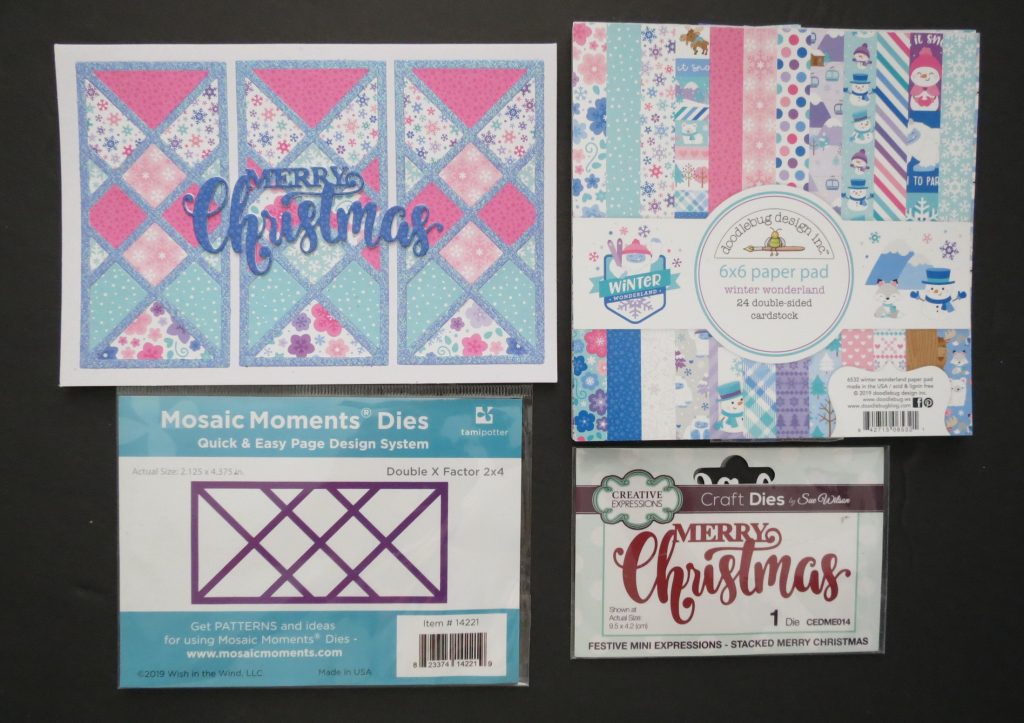
With so many smaller parts, it’s important that all the ends sit into their places properly. This is when I ran it though the die cut machine to flatten the card for a nice smooth look and securing all the pieces for a neat, smooth finish.
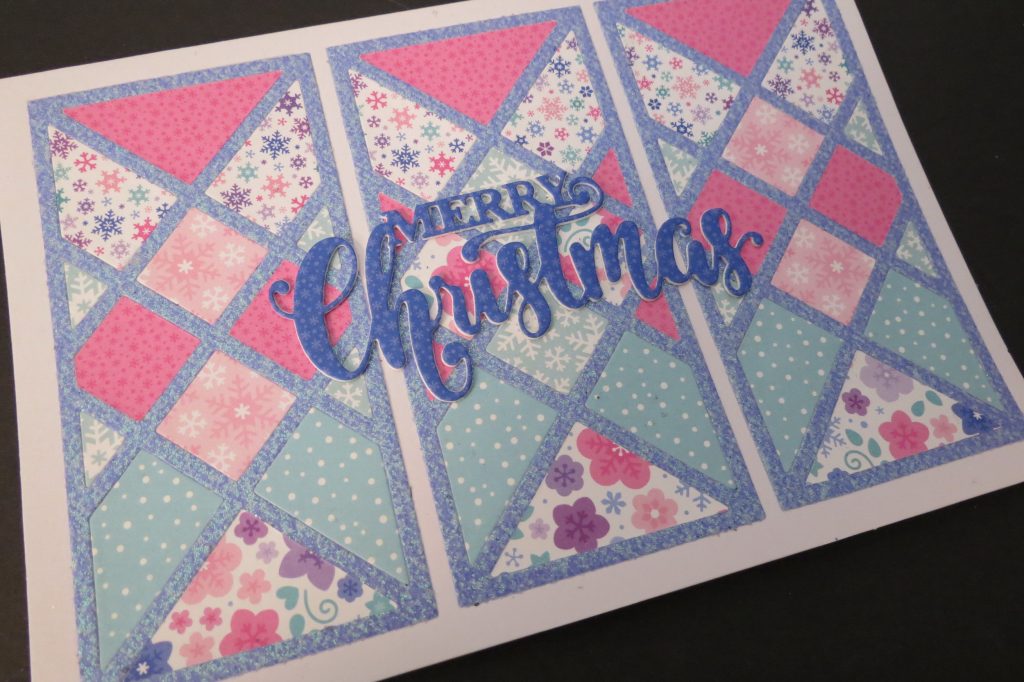
A Merry Christmas greeting die from Creative Expressions cut in multiple layers and stacked for a stand out finishes this card off.
Specialty papers, like glitter cardstocks, often add an element that takes your card up a notch with sparkle to match the season. This card could be duplicated easily when using a pack of papers with a number of arrangements with many complimentary, double-sided papers.
HAND CUT plus LEVEL ONE

Card Ten
I have one final card that is a take on an earlier card. This requires four shades of green hand cut into 1” strips then cut to size for the 6 5/8” width. This too is easy to make multiples with a few handy tools and your Double-sided Craft Mat.
I added one of my sentiment dies (Joy – Penny Black) stacked in multiple layers in white, stacked and adhered to the front of the card. Then cutting the Holly Border Dies in white to take the holly leaves and berries to hang from the ends of the “J” and “Y” for a simple, but elegant look.
Maybe there’s a few ideas that have sparked your creative mind for making Christmas cards from these ten cards, be sure to share your ideas with us we’d love to see them!
Andrea Fisher