
Sometimes I am tired of the same look of plain Paper Tiles. I absolutely love to use them, but some pages call for a little something more. I have six go-to Paper Tile techniques for whenever I need to change things up.
For those of you who new to Mosaic Moments, Paper Tiles are pre-cut paper blocks for embellishing and matting photos. Each pack comes with various sizes that fit on the grid. They add color to your pages and make your photographs pop! I use Paper Tiles all the time. They are a must for creating Mosaic Moments™ layouts.
1. Creating a Unique Frame
A simple way to add a little interest to Paper Tiles is by decorating the edges. I use two different types of corner punches depending on how I would like my photo to look on the Paper Tile.
If you look at the punch above there is a dashed corner. This line represents the corner of your paper. This type of punch makes little tabs that hold your photograph on your chosen paper.
When you punch the corners, they will look like this:
Now you can slip your photo in the tabs and it should stay in place (although I still use tape). When you add your photograph make sure it is cut 3/8 shorter than your Paper Tile block. For Example – This block measures 4.375 x 4.375 inches. I will cut my photograph to 4×4 inches (this is 3/8 in. less) to fit.
This is how the Paper Tiles frame looks with a photo. I also made a page with this – It is shown at the end of the ‘Creating a Border’ section.
2. Creating a Border on a 4.375w x 6.625h Block
Whenever you use a 4.375h x 6.625w Paper Tile, there is a little empty space on one edge since a 4×6 photograph cannot fit the exact measurements. Usually, we use this space for journaling. But, sometimes you may want to make a decorative edge instead. For the examples on this post I use a border punch but you can use other embellishments of you choice.
There are different varieties of border punches you can purchase. I chose this one in honor of Valentines, and I think the hearts would look pretty on the edge of a Paper Tile.
I love the Martha Stewart punches (I know I keep saying this, but they’re great!) I usually put my very first punch in the center. Then I continue to the edges. This helps the ends to look the same.
Here is a detail shot of the edge of the Paper Tile. Next you need to take the second 4.375 x 6.625 Paper Tile and tape it underneath this one. Without the second Paper Tile, it will not be able to cover the grid lines.
This is another example of a decorative Edge where I used this footprint punch:
Here is a Mosaic Moments™ 12×12 page with the Paper Tile Frame and the 4.375 x 6.625 block with a decorative edge:
“Just Engaged” supplies used:
- Mosaic Moments™ Lotus 12×12 grid paper
- Light Pretty Pink, Dark Pink, Medium Aqua and Pear Crush Paper Tiles™ (Sadly Pear Crush is no longer available 🙁 )
- Medium Pink Love Bird cornerstone
- Echo Park™ Pattern Paper from This & That Collection (Love this!)
3. Adding Ribbon to One Edge
Many of you have probably seen many pages with ribbon on the Paper Tiles. Ribbon makes a really nice embellishment… and it is really easy to attach it to a Paper Tile
Here I used a 4.375w x 5.5h block. Just take a roll of ribbon, and measure it above the Paper Tile. Cut the ribbon about two inches longer than the width.
After you cut the ribbon, turn it over on the back and tape over an inch at each end of the ribbon.
Fold the Ribbon over so it sticks to the back of the Paper Tile.
Finished! Now there is a nice ribbon on the Paper Tile. Simple.
But it doesn’t end there… you can tie a knot, or add a sticker or other embellishment to complete your ribbon. These are a few examples:
For this Paper Tile, I decided to use this heart charm. (You can see the final Page after the next section)
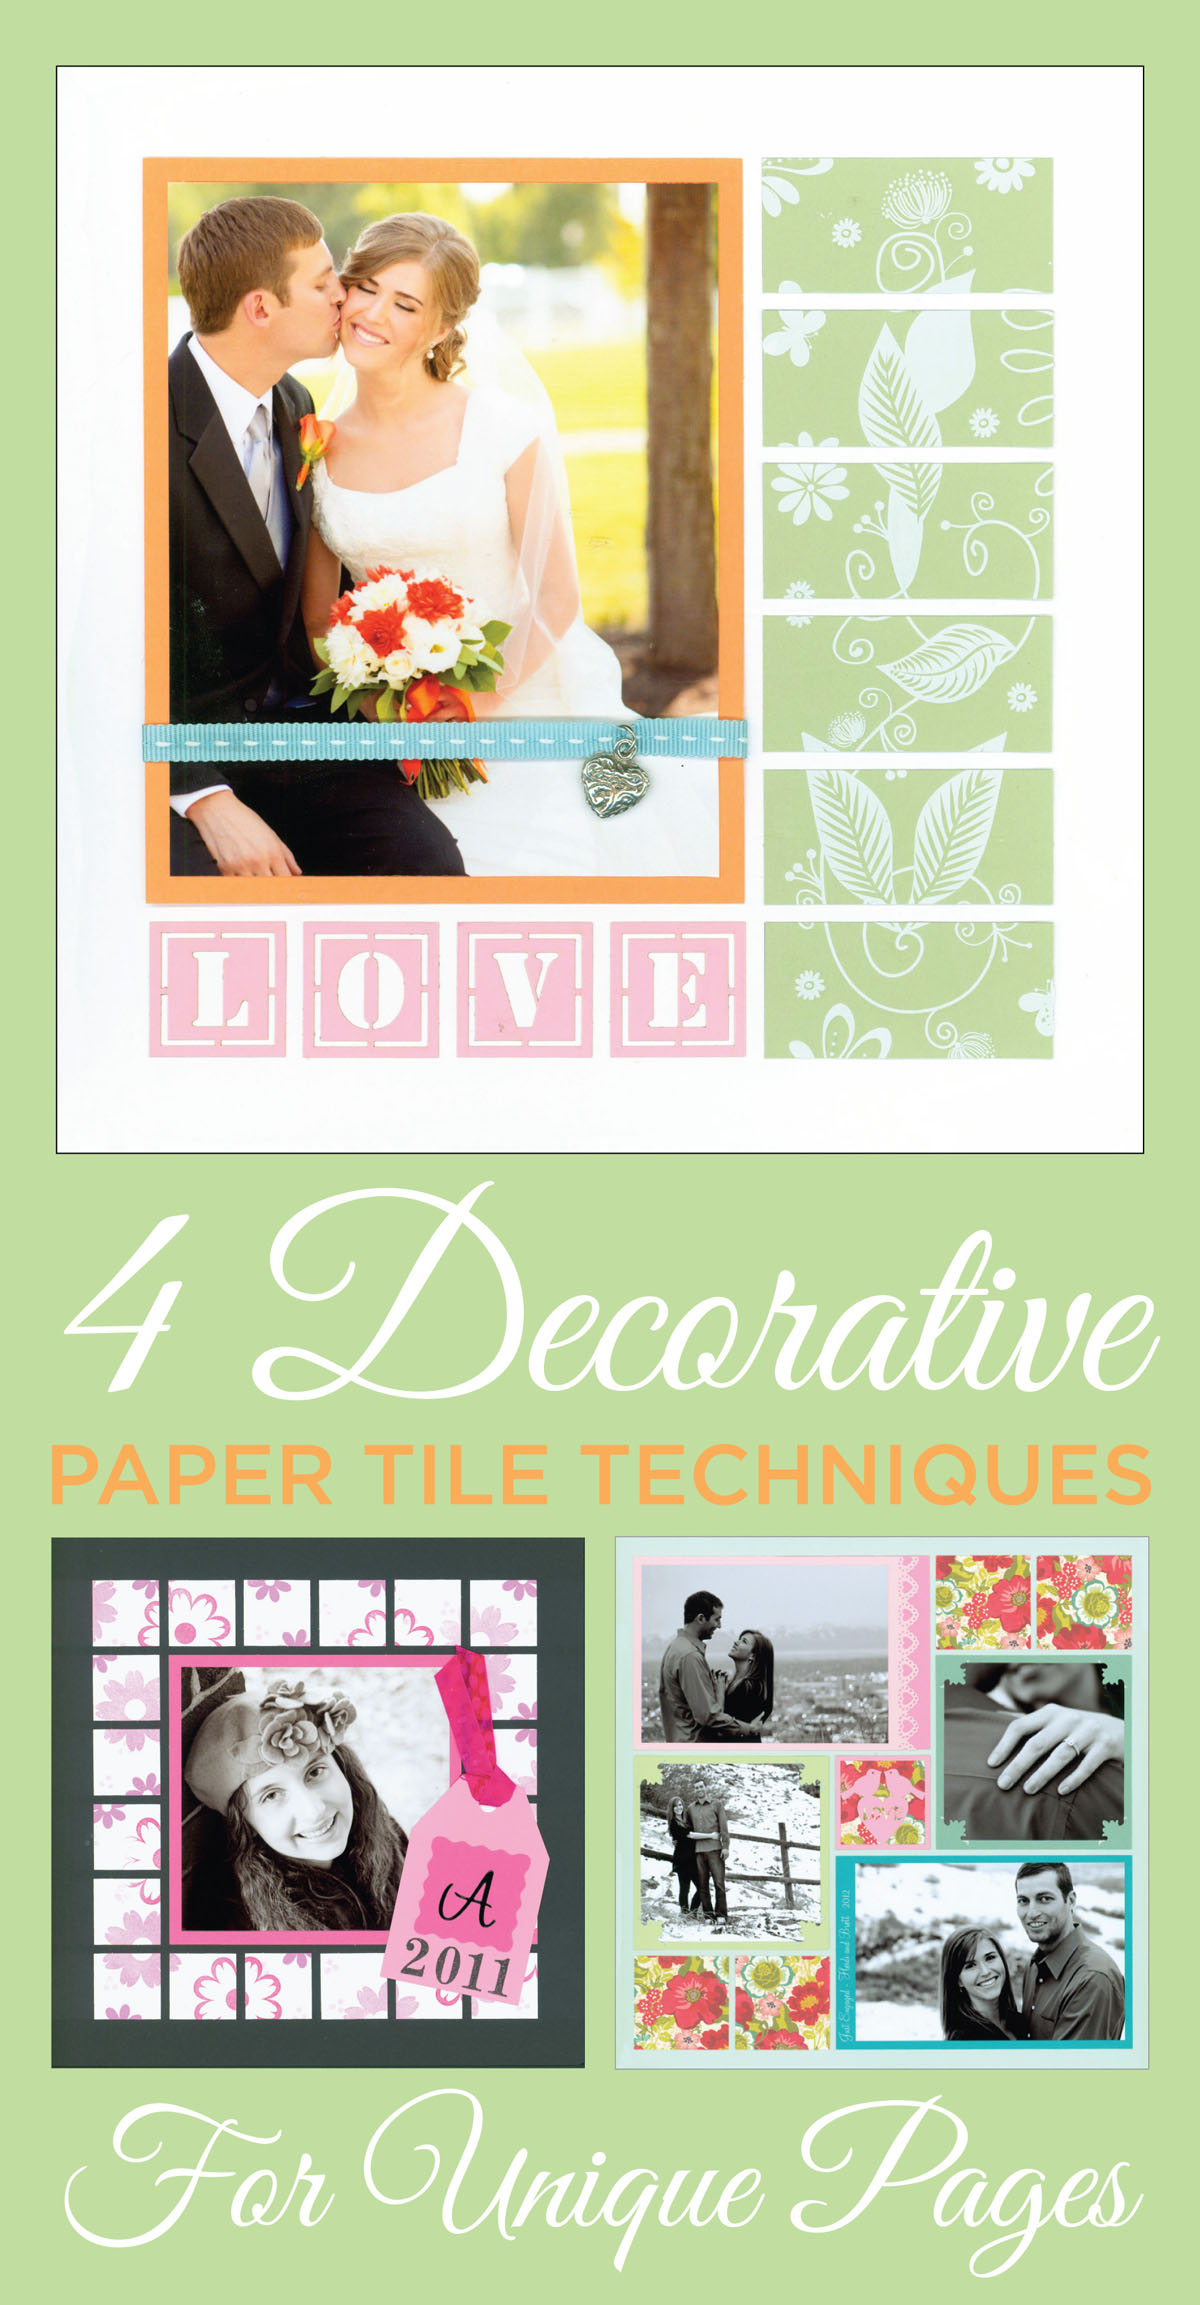
4. Using Stickers and Stamps to Make “Pattern Paper” Tiles
Did you know you can use Paper Tiles to make your own “pattern paper”. If you any stickers, rub-ons, or stamps you love this is a way to show them on your mosaic pages.
1. Stickers and Rub-Ons
Here I took a 2.125w x 6.625h Paper Tile and I decided to use this cute rub-on from Basicgrey™. The first thing to do is decide where you would like to place your embellishment on the Paper Tile(s). Since this is rub-on, I used an embossing tool to stick it on.
Pretty easy! Now you have a nice Paper Tile to add to your Mosaic Moments Page.
I actually decided I wanted to cut mine into smaller blocks. This page shows the final result of my decorative Paper Tile and it shows the Paper Tile with the ribbon on the border:
“Love” supplies used:
- Mosaic Moments™ White 8×8 Grid Paper
- Medium Peaches & Cream and Apple Crush Paper Tiles
- Four Square L-O-V-E Cornerstone
- Rub-On from BasicGrey™
- Blue ribbon
- Heart Charm
2. Stamps
Of course, you can use various stamps to decorate Paper Tiles. I am actually going to show stamping on the Paper Tile™ One inch squares pack. These are fabulous for making your own pattern paper.
To begin, Choose your largest stamp. Stamp evenly around the page as much as possible.
Repeat the first step with each stamp beginning with a largest stamp and continuing until you get to your smallest stamp. Use the smaller stamps to fill in the extra small spaces on the Paper Tile™ sheet.
Here is the entire sheet finished. Easy! Now you can simply take the pieces you want for your page and stick it on with adhesive.
Here is an 8×8 example Mosaic Moments with the decorative Paper Tiles:
“Alexis” supplies used:
- Mosaic Moments™ 8×8 Black Grid Paper
- Cyclamen Pink Paper Tile
- Dark Pink Card-stock to create tag
- White 1 in. Paper Tiles
- Clearly Numbers Stamps by Tami Potter
- Flower Clear Stamps
I hope you were inspired to make more pages from this post. You not limited to using these techniques on the Paper Tiles, also use them on Circle Tiles, Banner Tiles, etc. If you have a particular idea on mind – hurry and get scrappin!
Thanks for visiting!