

Get our Step-by-step directions on this awesome gift idea for fathers! An explosion box is a unique way to display photos and show your unique style. The special Dad, or father figure, in your life will love the masculine look of this box and will be surprised by how much you add to the inside!
You might be wondering how do you create an explosion box with Mosaic Moments? The secret ingredient? RTC (Ready To Cut) grid paper. This special grid paper allows you to create cards, and other fun projects. So hurry and get started before Father’s Day arrives!
Supplies You Will Need:
- 4×4 RTC Grid Paper
- Pencil
- Good Quality Eraser
- A Ruler
- An Exacto Knife
- Cutting Mat
- A Score
- Repositionable Tape
- Permanent Tape or Glue (to create lid)
- Embellishments and/or Photos of your choice
1. Get Measuring
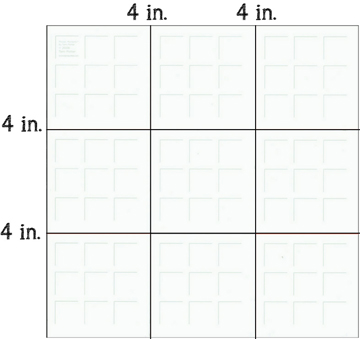
To begin, Take your RTC paper and measure every 4 inches across the top. You can leave a little notch with your pencil to remember where you measured. Next, draw lines, lightly with your pencil, that go vertically across the entire paper as shown below. Also do this horizontally across your paper.
Your page should look like there are nine squares and each should be 4×4 inches.
Tip: Always, Always remeasure to make sure everything is correct!!
2. Prepare to Cut
Once you have you lines drawn, Use your Exacto knife and ruler to carefully cut out the squares on each corner. The lines you need to cut are shown here in red:
3. Score!
After you cut, the grid paper should look like the image shown below. Now SCORE the pencil lines that are left on the RTC paper. These lines are circled in the image. Fold each square towards the center of the page. Erase any pencil markings with a quality eraser.
4. Now for the Best Part… Embellish!
WhooHoo! The hard part is done! Now grab your patterned paper, embellishments, and photos! Make sure you choose masculine colors (or your Dad’s favorite colors) that he will love! The colors I chose are based on patterned paper from Echo Park™’s This & That collection – love it! I use some of this paper for the lid later in the post.
Above, you can see what mine looks like on the inside! With Mosaic Moments™ grid paper you can add multiple photos. This box shows me and my siblings. I placed a photo in the outside squares and all of use wrote a simple message underneath our photos. Here is a close up of one of these sections:
In the center, box it displays the main message of the box – “Happy Father’s Day” (created with a stamp). I cut a few strips and used a Circle punch to cut some patterned paper. I really like the wood look for Father’s day since it is more masculine. I also used pop dots to give a 3D look.
5. Now Create the Lid
We can’t forget the lid! This is a great element to cover up the surprise in the inside of your box. Grab your favorite patterned paper or Cardstock to get started. Today I am using patterned paper (Echo Park™) from a 6×6 paper pad pack.
Flip your paper over to the back. Take a pencil and draw a one inch border on each side like in the image below (lines have been darkened so you can see better). When you are done, SCORE along ALL of the lines. Use a ruler to keep them straight.
Now take your Exacto knife and cut along the lines that are circled in the image below to create 1in. slits. DO NOT cut past the horizontal lines.
After you create the slits, use permanent tape in the spots circled below in the image. Fold the little flaps (created with your Exacto knife) and fold them so they are on the inside of the lid.
Here is how the lid should look like when it is finished:
Here is the final box (shown below). To decorate the outside of the box, I used “This & That Charming” 6×6 pattern paper . If you want to use patterned paper, cut each square 4×4 inches so the outside is completely covered. We hope you enjoy creating your project! Remember, you can also create this for Mother’s Day, recent Graduates, or a thank You to teachers.